Demolition:
A Tutorial On Creating A Clone Of The 1970s Arcade Game ‘Breakout’ In Scratch

First version published
Last updated
First version published
Last updated
This project is an intermediate to advanced Scratch (version 3) programming tutorial which will walk you through creating a clone of the classic computer game Breakout from the 1970s.
In the game, the player tries to knock a ball against a wall of bricks in order to demolish the wall. As the ball bounces off the wall, the player tries to knock the ball back towards the wall using a bat. The player wins the game by completely destroying the wall. If the player fails to knock the ball back towards the wall with the bat, the ball drops off the bottom of the screen and the ball is lost.
In this project we will cover various coding concepts which are marked with the “ribbon tied to a finger” icon shown to the left. These include:
variables: places to store information which can change while your code is running
loops: telling the computer to do the same thing more than once
blocks: chunks of code that can be reused
parameters: information passed to a block that tells the block more precisely how to behave
events: things which happen in one part of your code which another part needs to know about (often done in Scratch by broadcasting and receiving messages)
cloning a sprite: creating (and destroying) copies of the same sprite
This is not a tutorial meant for complete beginners: if you are a Scratch beginner, I suggest you look at the Code Club Scratch modules and the CoderDojo Scratch projects. If you are following this tutorial, I am assuming that you have at least a basic level of Scratch knowledge.
I have provided code for all the steps in this project (and the optional challenges), so don’t worry if you get a bit stuck. I have also tried to add useful comments to my code to explain what it’s doing.
My solution is probably not the only possible solution as there is usually more than one way to do something. It may not necessarily be the best solution, so if you have a better idea, feel free to contact me.
In writing our code I am going to try to use good programming practice and I encourage you to do the same. Specifically, I mean:
brick. e.g. brick.width, brick.heightFollowing these guidelines will help make our code easier to read, test and extend later on.
In the game, the screen (which Scratch calls the Stage) is laid out as follows:
When the player launches the ball it starts travelling up the screen (usually diagonally). When the ball hits a brick, the brick breaks and disappears, and the ball bounces back off it, usually back down the screen towards the bat. When the ball hits the bat, it bounces off it and travels back up the screen towards the wall. The aim of the game is to knock out all the bricks in the wall without losing the ball into the water.
You can probably guess that the bat and ball will be Scratch sprites. I have chosen to make the water strip a sprite too rather than making it part of the backdrop, because that makes it easier to move around, easy to detect when the ball falls into it, and it can be animated by changing its costume. It can also be removed simply by hiding the sprite.
We will also need brick sprites to build our wall. Now we could design one brick sprite and then duplicate it several times, moving each duplicate into the right position in the wall. But there are a few reasons why we don’t want to do that:
What we really want is for every copy of the brick sprite to behave in the same way, and that means we want each copy to share the same costumes, sounds and code. Fortunately, Scratch gives us a way to do exactly that: we can clone (in other words: make a copy of) a sprite many times over. All we need is one brick sprite to act as the template.
We also need a logical place to put the code that builds the wall. It doesn’t belong in the brick sprite because the code controls the behaviour of the wall of bricks as a whole, not of each individual brick. We could put the wall code into the stage, but I have chosen to put it into a wall sprite (which will have no costume and be invisible). This means the stage can stay clean by containing only code that relates to the game as a whole. It also allows me to have variables which can only be seen by the wall’s code (Scratch calls these local or private variables).
So to sum up, these are the sprites we will need in our game:
batballwaterbrickwallThe stage in Scratch is a fixed size: 480 pixels wide by 240 pixels high.
In Scratch, you describe a point on the stage by its x and y coordinates. The x coordinate specifies how far across the stage from left to right the point is. x coordinates run from −240 (the left edge of the stage) to +240 (the right edge); an x value of 0 means the horizontal centre of the stage.
Similarly, the y coordinate tell us how far up or down the stage a point is. y coordinates run from −180 (the bottom edge of the stage) to +180 (the top edge); a y value of 0 means the vertical centre of the stage.
Take a look at the diagram of the stage below:

We can see that the point with position x=0 and y=0 is at the centre of the stage. The x and y positions of each corner of the stage are also shown.
This diagram will be useful later when we want to work out where on the stage to place our bricks when we want to build a wall.
An event is simply something that happens which requires our code to take action. It can be caused by the user, for example by pressing a key or clicking the mouse, or by the computer when some condition arises while code is running.
When coding in Scratch, it is often helpful to think about the events that the program will need to handle. To put it another way, we can ask ourselves:
“What might happen during the game, and what should the code do in response?”
I asked myself that question and my answers are summarised in the table below.
| Event | Action required |
|---|---|
| start of the game: setup |
|
| the player launches the ball |
|
| the player moves the mouse left or right |
|
| the ball hits the bat |
|
| the ball hits a brick |
|
| the last brick is broken |
|
| the ball falls into the water |
|
| the player pauses the game |
|
OK, let’s fire up Scratch and open the template Scratch project for this tutorial.
Sign in to Scratch and then click  to create your own copy of the template.
The template project contains:
The stage contains four backdrops:
a completely blank backdrop named blank
a backdrop named round completed with a simple “well done” message that we can show to the player when he/she has completely demolished the wall
a backdrop named game lost with a “bad luck” message that we can show to the player when the game is lost
a backdrop named title screen which be shown when the project is first opened and will also be used as the title image for the project
It also contains one sound: the Tada sound from the Scratch library which will play when the player breaks the last brick.
bat Sprite![]() The
The bat sprite is a copy of the Button2 sprite from the Scratch libary. It is very simple: it has only one costume and one sound, the Tennis Hit sound which will play when the ball hits the bat.
ball Sprite![]() For the
For the ball sprite I have just used the Ball sprite from the Scratch library. It has 5 costumes, so select whichever colour costume you like best (I went for green). It also has one sound: the Splash sound from the Scratch library which will play when the ball falls into the water.
water Sprite![]() For the
For the water sprite I found a nice wave animation on Youtube and cropped it down to a suitable size. Each costume is one frame of the animation so we’ll need to show each costume in turn to animate the water. It has no sound, but you could add sound if you like — perhaps the Ripples library sound would be a good starting point.
brick Sprite![]() The
The brick sprite is a copy of the Button3 sprite from the Scratch library. I have given it:
5 costumes of different colours so we can build a multi-coloured wall. Later we could extend the game so that different colours of brick do different things (e.g. award bonus points, drop power-ups for the player to catch with the bat etc).
one sound (a quieter version of the Drum Bass1 library sound) which we’ll play when the ball hits a brick.
The brick sprite is (at the size I have chosen) 40 pixels wide by 24 pixels high. This will be important later when we want to build a wall of bricks side-by-side.
wall SpriteThe wall sprite is a completely empty sprite, set to invisible, which will hold our wall-building code.
It can be overwhelming when you first start thinking about writing a program: it’s often difficult to know what to do first. I have broken the game down into “tasks” that our code needs to perform, so we can write (and test) our code a little at a time.
Each section below introduces a task, a problem our code needs to solve. Each green box below describes the task and invites you to try writing the code to do perform it. I have also provided my code so you can see how I’ve solved each problem.
My code is hidden in case you want to try writing your own code without looking at mine: simply click or tap on “See my code” to reveal it. Similarly with hints: click or tap on “Hint” to reveal the hint.
Right, that’s enough introduction — let’s get coding!
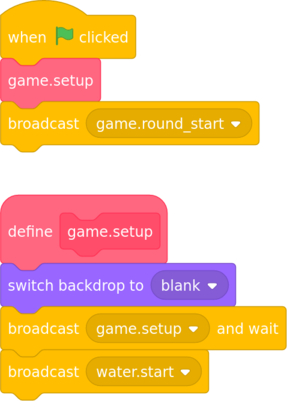
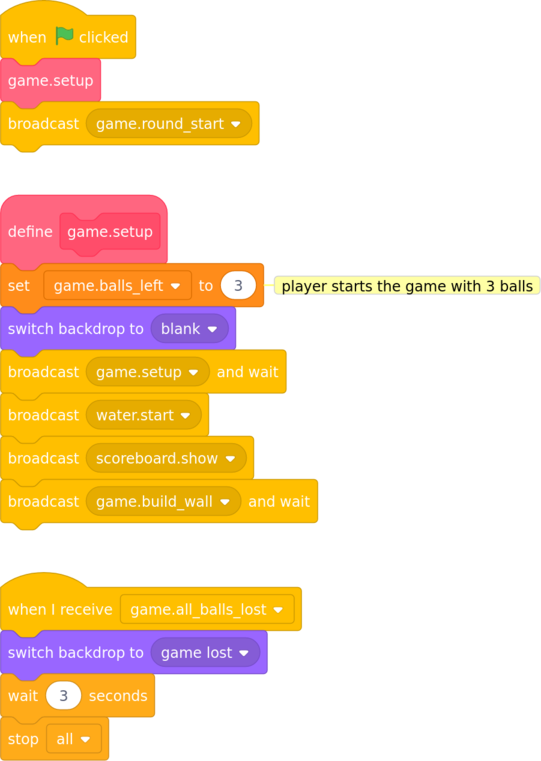
Most computer code needs to do some setup or initialisation when it is first run, and our game is no different. Let’s create a custom block to hold our setup code. Creating a custom block allows us to keep our setup code grouped together, making our code tidy and easy to read, understand and extend later on.
Create a custom block named game.setup in the stage. To do this go the  category and click the “Make a Block” button. Type the name
 game.setup and click OK.
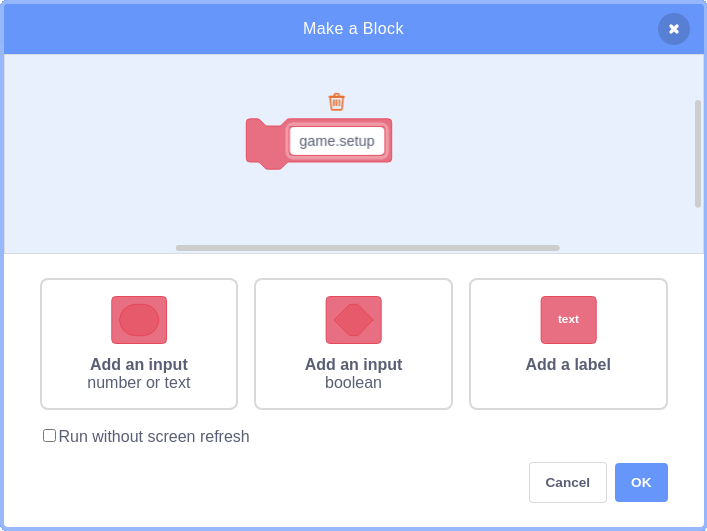
This will create a Scratch block labelled define game.setup; we can now add code under that block that will run whenever we use the game.setup block.
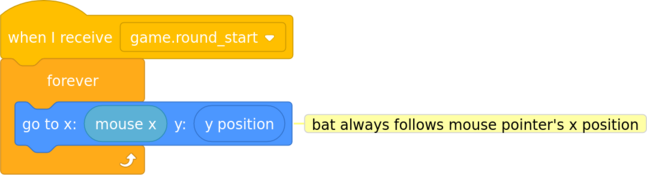
What does our setup code need to do? If you refer back to the section Events: Things that happen during the game you may remember that (among other things) it needs to set the stage to the correct backdrop. That’s a simple step so let’s add it to our game.setup block now (the other steps we can add later).
We also need to tell the other sprites to perform their setup tasks too. In Scratch, whenever we need to ask another sprite to do something we broadcast a message. Other sprites can listen out for messages and when they hear a message they’re interested in, they can take some action.
Add code to the game.setup block to broadcast a message called game.setup. Because we don’t want the program to do anything until all the setup code has finished, we need to use the  block.
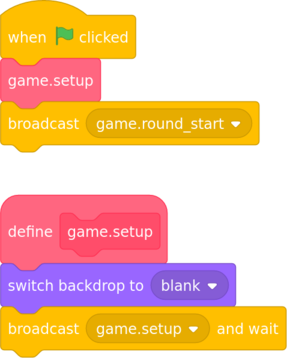
Finally, we need to get Scratch to run (or call as we say in coding) the game.setup block. The usual way to start a Scratch program is to click the green flag, so let’s add a  block and get it to call the
 game.setup block.
Having written our first piece of code, we need to test it. For now let’s just check that it changes to the correct backdrop: manually set the stage to one of the other backdrops (either the winning or losing backdrop will do), and click the green flag. Does the stage change to the blank backdrop?
Once you’re satisfied that your code does what it should do, move on to the next section.
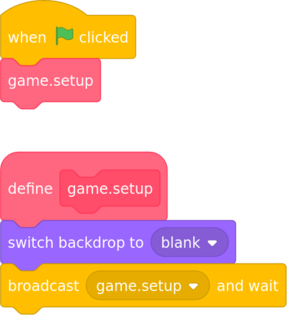
The bat is positioned near the bottom of the stage at position y=−135. We want the player to be able to move it left and right (but not up and down) using the mouse.
Again, we’ll use an event to let the bat know when to start moving: I called the event game.round_start because it signifies that a round of the game (by “round” I mean a passage of gameplay that starts with the player launching a ball and ends when either the ball falls into the water or the wall is completely demolished) is about to start.
Add code to the bat sprite to tell it to follow the mouse left and right, but not up and down. Remember to broadcast the game.round_start at the start of the program (add it under the block in the stage).
We want the bat to follow the mouse’s x position but stay at its own current y position.
In the bat sprite:
In the stage:
Again, test your code to check that it does what you want before moving on to the next section.
I have given the ball a fixed starting direction of 40 (i.e. when it moves, it will travel upwards and to the right). I will discuss direction in Scratch in more detail later in the section Direction in Scratch.
Add code to the ball sprite to tell it to continually move around the stage, bouncing if it hits the edge. How fast you move the ball is up to you.
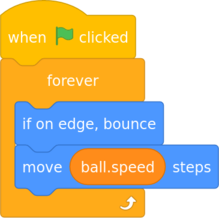
To allow the game to vary the speed that the ball moves, I created a variable named ball.speed. I found setting it to 8 (so that the ball moves 8 steps at a time) makes the ball move at a reasonable speed. Later on we could make the speed of the ball vary, perhaps getting faster as the games goes on.
As always, test your code.
See Challenge: start the ball moving in a random(ish) direction.
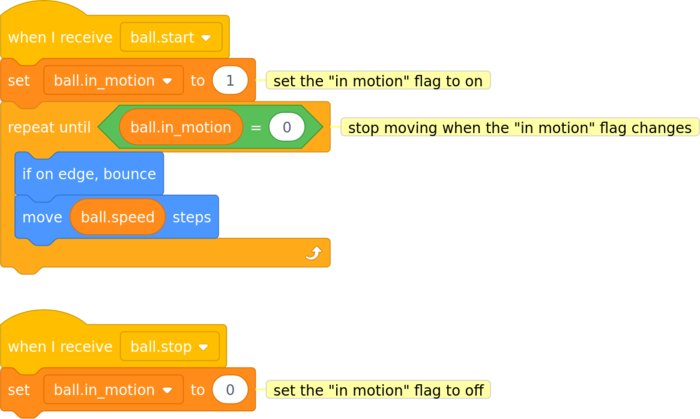
We have already discussed the events that will cause the ball to start and stop moving (see the section Events: Things that happen during the game above). Now let’s put that planning into action.
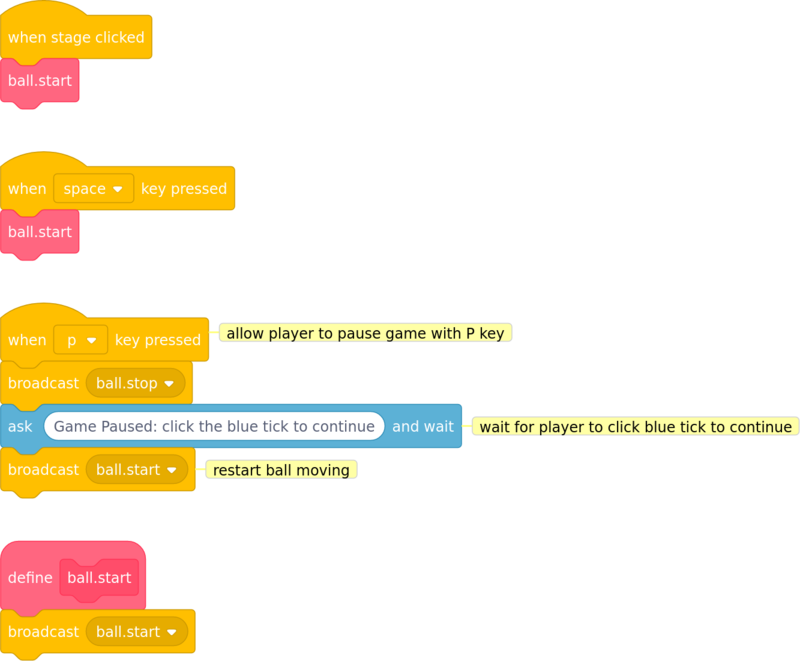
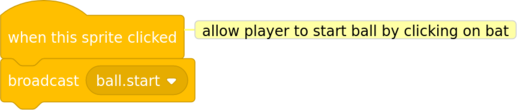
We need a way for the player to “launch” the ball at the start of the game. I decided that the player should be able to do this either by clicking the mouse (on the stage or the bat), or by pressing the space key. In response to the player’s mouse click or key press we need to tell the ball to start moving.
As I mentioned earlier, whenever we need to ask another sprite to do something in Scratch we broadcast a message. Other sprites can receive messages and take action. I called the message ball.start.
There are several events that should cause the ball to stop moving, so we’ll also need a message for that: I used ball.stop.
Write code to broadcast the ball.start message in response to the player clicking or pressing space. Then adapt the code to bounce the ball around the stage we wrote above to listen for this message and set the ball moving.
Once you’ve got that working, add code to stop the ball moving in response to the ball.stop message: for now, just trigger that message in response to a key press: let’s use P for pause.
Hint:
The code which moves the ball uses a 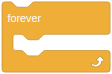 loop. As it stands there is no way to exit this loop and stop the ball moving.
We could perhaps use the  block but that would stop all scripts in all sprites, effectively ending the program, and we don’t necessarily want to end the whole game. The player may want to simply pause the game and carry on from where they left off.
We need a “clean” way to exit the forever loop and stop the ball moving.
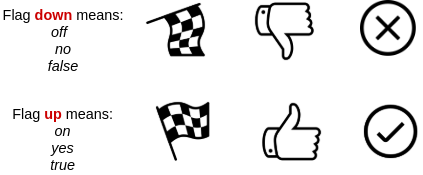
I decided to use a flag variable to tell the forever loop when to exit. A flag has two possible states: it is either on or off. You can think of the flag as either being up (or on, or meaning yes) or down (or off, or no). This type of variable is often known as a Boolean variable.
I named my flag variable ball.in_motion:
0 which I use to mean no or is not moving.ball.in_motion to 1 (meaning yes or is moving).ball.stop message, it sets the ball.in_motion flag back to 0.For the movement loop I changed the block to a 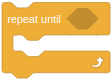 block which stops as soon as the
 ball.in_motion flag changes to 0.
In the ball sprite:
In the stage:
In the bat sprite:
Test that your code launches the ball when you click the stage or bat, and when you press the space key. Check that pressing the P key causes the ball to stop moving.
While this is not strictly necessary for the game, I liked the idea of the strip of water at the bottom having a moving wave effect. It’s also a nice exercise in creating simple animation effects in Scratch.
Add code to the water sprite to cycle through each of its costumes in turn to give the water a moving wave effect. You may need to add a delay between costumes to make the effect look natural: experiment with the length of the delay until you’re happy with it. Trigger the animation in respose to an event: I named the event water.start.
In the water sprite:
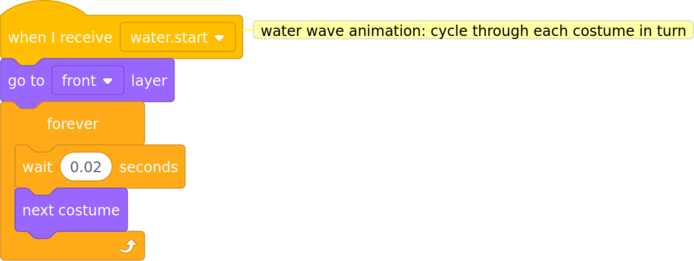
With a delay of 0.02 seconds between costume changes the water looks as though it has waves gently rippling through it.
Note: I added a go to front layer block so that the water will hide the ball if the ball moves behind it, making it appear that the ball has fallen into the water.
In the stage:
Don’t forget to test your code.
One way to tackle a complex coding task like this is to break it down into smaller pieces; then you can gradually put the smaller pieces together until the code does what you want. Scratch has a feature to help us do this: we can define our own blocks and use them elsewhere in our code. Let’s work through the code to build the wall together, step by step.
How do you build a wall? First, you lay a row of bricks end to end. Then you lay another row on top of the first row, and so on until the wall is as high as you want it.
So first, we want to write a block of code to lay one row of bricks — let’s call that build_row. Then, once we’ve written and tested that block, we want to write another block which runs (we say calls in coding) build_row several times to create a wall of several rows: every time it calls build_row, another row of bricks will be added to the wall.
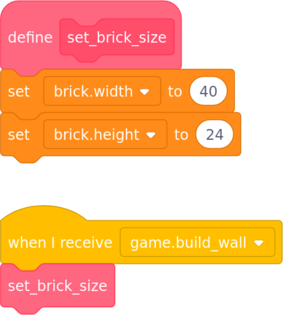
In order to place our bricks side by side, we need to know how wide one brick is. Remember I said earlier that our brick sprite is 40 pixels wide by 24 high? Those measurements are going to be crucial to our building, as all the wall’s measurements will be derived from them. They’re so important that I’m going to store them in variables. This will make it much easier to change the brick size later on if we decide to (you might think my basic brick sprite looks nothing like a brick and want to design your own of a different size).
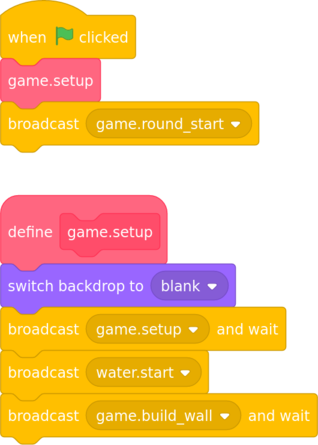
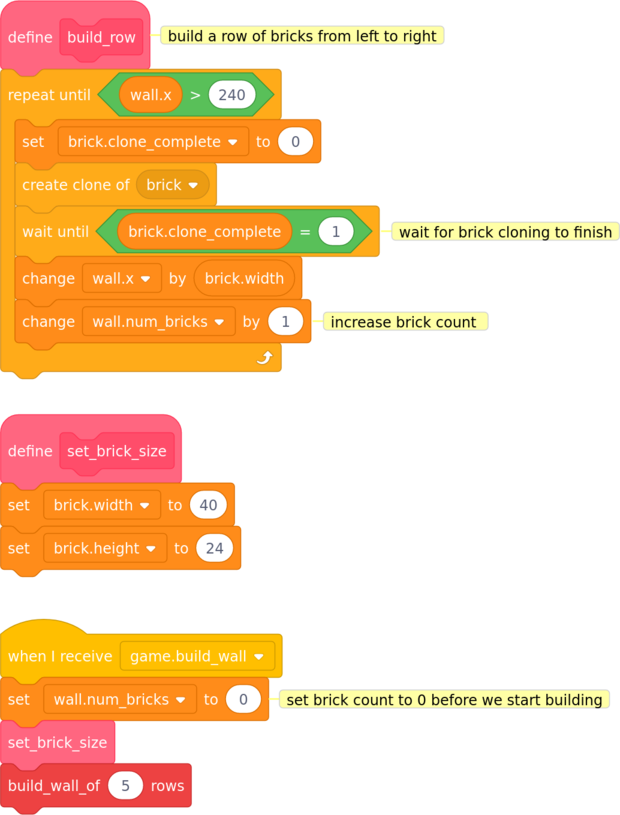
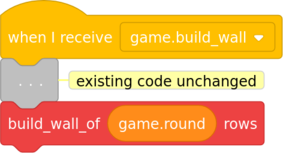
When do we want to build the wall? We know that it needs to be at the start of the game, before the player launches the ball, but as we don’t yet know precisely, the most flexible way is to start building in response to a message. Let’s listen for the message game.build_wall before we start building.
In the wall sprite, create two variables named brick.width and brick.height to hold the width and height of a brick (in Scratch, we do this by using the Make a Variable button under the  category). Only the wall needs to know about brick size, so we can make the variables private or local to the
 wall sprite, so that only the wall can see them or make changes to them. Scratch calls this option For this sprite only.

In general it’s a good idea to keep variables as private as you can: it avoids them being accidentally changed by other parts of your code. In coding this principle is called encapsulation.
Scratch will set the values of our variables to zero. We need to change these to the correct width and height before we start building, so write some code to do this. I chose to put my code into a block to keep it tidy and in case I want to add any more setup code later.
To create a scratch block:
categoryset_brick_sizeIn the brick sprite:
In the stage:
You can check that Scratch has set the variables to the correct values simply by clicking on the variable at the left side of the screen: Scratch will show you the current value of the variable. This is very useful when testing. Has your code set the values of brick.width and brick.height correctly?
That was easy, wasn’t it? Next we need to write a block to lay a single row of bricks.
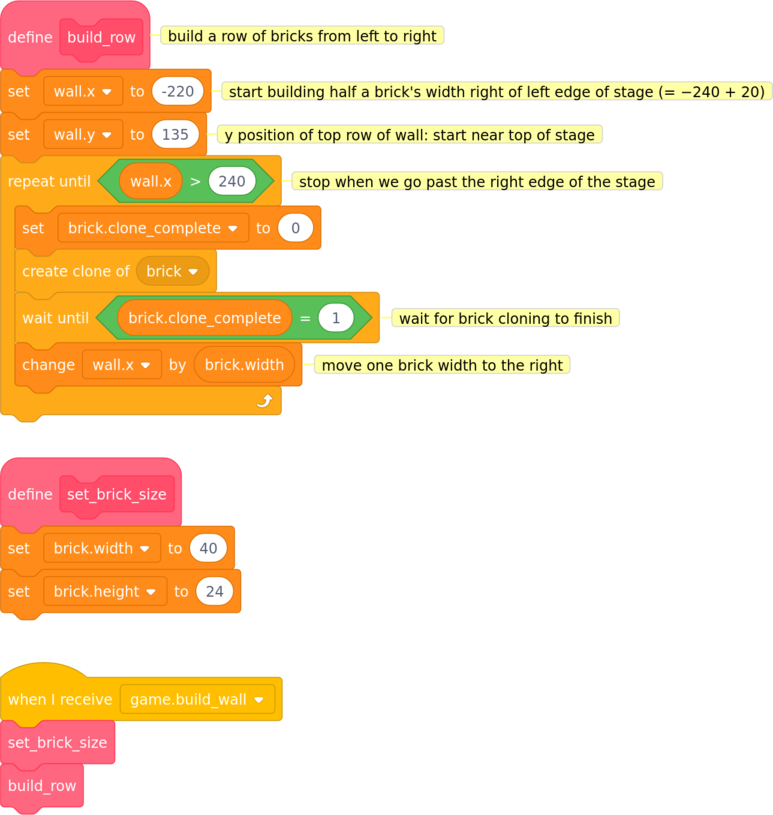
build_rowLet’s create a new block (also in the wall sprite) named build_row.
The block needs to do something like this:
I’d like to introduce a couple of general coding terms at this point:
A loop is simply a section of code that repeats more than once. In this case we repeat the steps of placing a brick and moving along the wall.
An outline of what a piece of code is supposed to do, such as the steps outlined above, is called an algorithm: a set of steps the computer should follow to complete a task.
You may have spotted that the code will need to keep track of where the last brick was placed (how else does it know where to put the next brick?). And wherever code needs to keep track of information we can use variables.
I created two variables named wall.x and wall.y (this time for all sprites because the brick sprite needs to be able to see them too) to store the x and y position on the stage where we want the next brick to go. I think of them a bit like fingers pointing to a position on the stage telling the wall where to put the next brick.
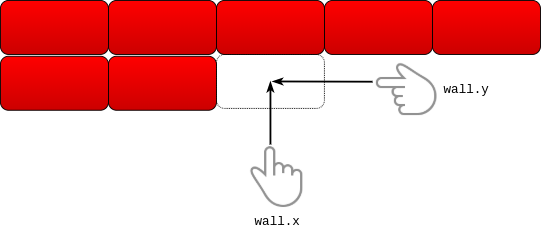
wall.x and wall.y point to the position of the next brickI think the trickiest part of this code is actually creating a new brick and putting it in the right place, so I’m going to explain that in a bit more detail. If you already feel confident enough to try writing your code, feel free to skip the next few paragraphs and jump straight in.
In Scratch, we make copies of a sprite by using the block ![create clone of [sprite]](img/block.create_clone.png) . What makes it tricky is telling the new copy how to behave once it’s been created. Your first instinct might be try adding code after the block but that won’t work: the only way to get a sprite to change its position is for the sprite to move itself.
. What makes it tricky is telling the new copy how to behave once it’s been created. Your first instinct might be try adding code after the block but that won’t work: the only way to get a sprite to change its position is for the sprite to move itself.
Do you recall how do we ask a sprite to do something? We broadcast a message, and get the sprite to listen out for that message.
Now, when we create a clone of a sprite, Scratch automatically sends the new clone a special message to tell it that it’s just been created. To make the sprite act on that message, we write code in that sprite under the 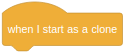 hat block. So we’ll also need to add some code to the
 brick sprite to tell it to move the right place after it’s been cloned.
First create the wall.x and wall.y variables (remember to select For all sprites), and then have a go at writing the code for the build_row block.
Hint: in Scratch, the x and y properties of a sprite refer to the point at the centre of the sprite. So if we want our first brick to be placed at the left edge of the stage, we need to set wall.x to a value which is half a brick’s width to the right of the left edge. You might need to use some trial and error to get the start of the row in the right place and to work out when to stop building.
Note: my first attempts at writing my code contained a bug. A bug is simply a coding mistake, something the code does that programmer did not intend.
The type of bug I encountered is known as a race condition. This is when the behaviour of one piece of code relies on another piece of code completing first. In my case, I found that my code was changing the wall.x variable before the brick’s when I start as a clone script had finished, and so the brick was put in the wrong place.
A possible quick fix is to add a small delay after the create clone block to allow the clone time to position itself before the wall.x variable changes: a wait of 0.01 seconds seemed to be enough. However, this isn’t really a robust solution: what if the code were to be run on a much faster computer? The 0.01 second delay may then not be enough.
A more robust solution is to get the clone to signal when it has completed. I decided to use another flag for this which I named brick.clone_complete. The code works as follows:
brick.clone_complete to 0 (meaning no or is not complete).brick.clone_complete equals 1 (meaning yes or is complete) before continuing.when I start as a clone script, the code sets brick.clone_complete to 1.In the wall sprite:
In the brick sprite:

The advantage of writing code in small blocks is that they are easier to test on their own: just click the block, watch what the code does, and if it’s not quite right, alter the code and test again. Keep refining and testing until the code does what you want it to.
If you look at my code above you will see that I added another block to the brick sprite named pick_random_costume. You can probably guess what the block does from its name — can you see how the code achieves it?
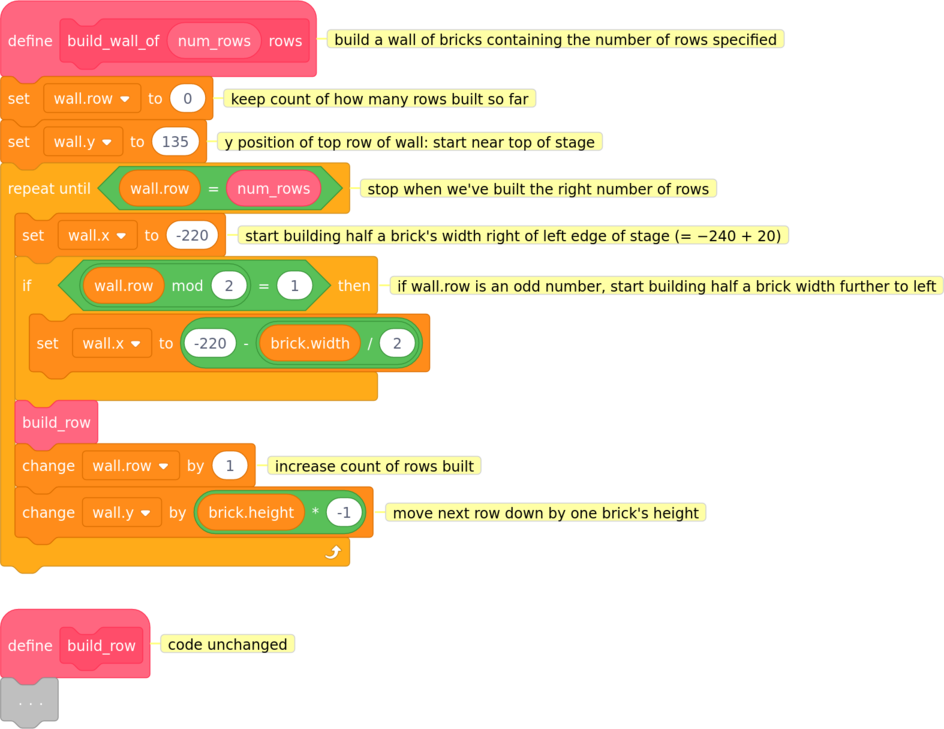
build_wall_of_(n)_rowsNow that we can build a single row of bricks, it’s time to use that to build a wall. How many rows of bricks do we want in our wall? I’m having trouble deciding: perhaps to begin with we only want a few rows, say three, but I might change my mind later. Perhaps we may want to have several “levels” in our game and add more rows to the wall as the player progresses through the levels.
There’s a useful coding concept that can help us here: parameters. A parameter is a placeholder for a piece of information (known as a value) that you pass to a block of code to tell the block more precisely how to behave.
For our wall building block we don’t want the number of rows of bricks to be fixed in advance. Wouldn’t it be useful if we could write our block so that it could build any number of rows? Well, we can, using a parameter; Scratch calls parameters inputs.
To create a scratch block to build any number of rows:
categorybuild_wall_ofnum_rowsrowsIf you followed my suggested names it should look like this:
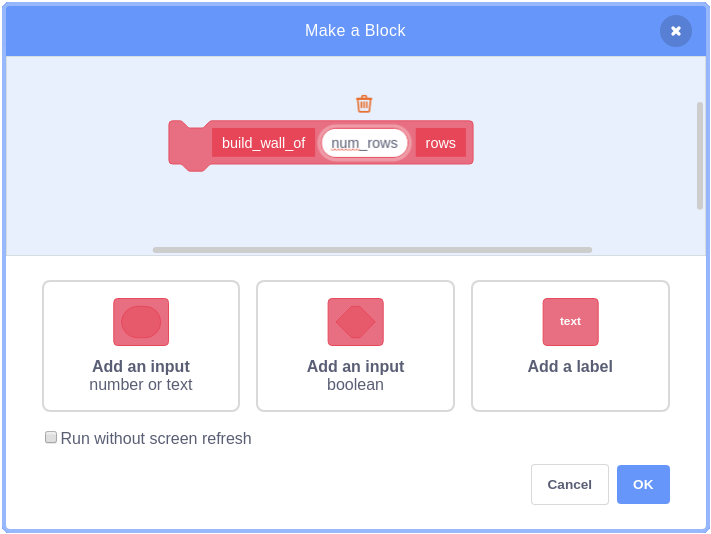
Note: The label “rows” I added at the end doesn’t actually do anything in the code: it’s purely there to make the name of the block more readable; it means we can write code such as build_wall_of 3 rows instead of build_wall_of 3.
Once you’re happy with your block definition, click OK to create your block. Now it’s time to add the code to build several rows of bricks.
Remember that my code in the build_row block set a fixed start position for the row? Well that’s not ideal: if I call build_row twice, it will place the second row at exactly the same place on the stage as the first, and we’ll end up with two rows directly on top of one another so that we only see one row. (By all means try calling build_row twice to see what I mean.) So that needs to be changed.
When we want to do the same thing more than once, we usually want to use a loop. If you’re having trouble writing your code, start with a simple repeat block that calls build_row 3 times.
I moved the set wall.x and set wall.y blocks out of build_row and into my new build_wall_of (num_rows) rows block.
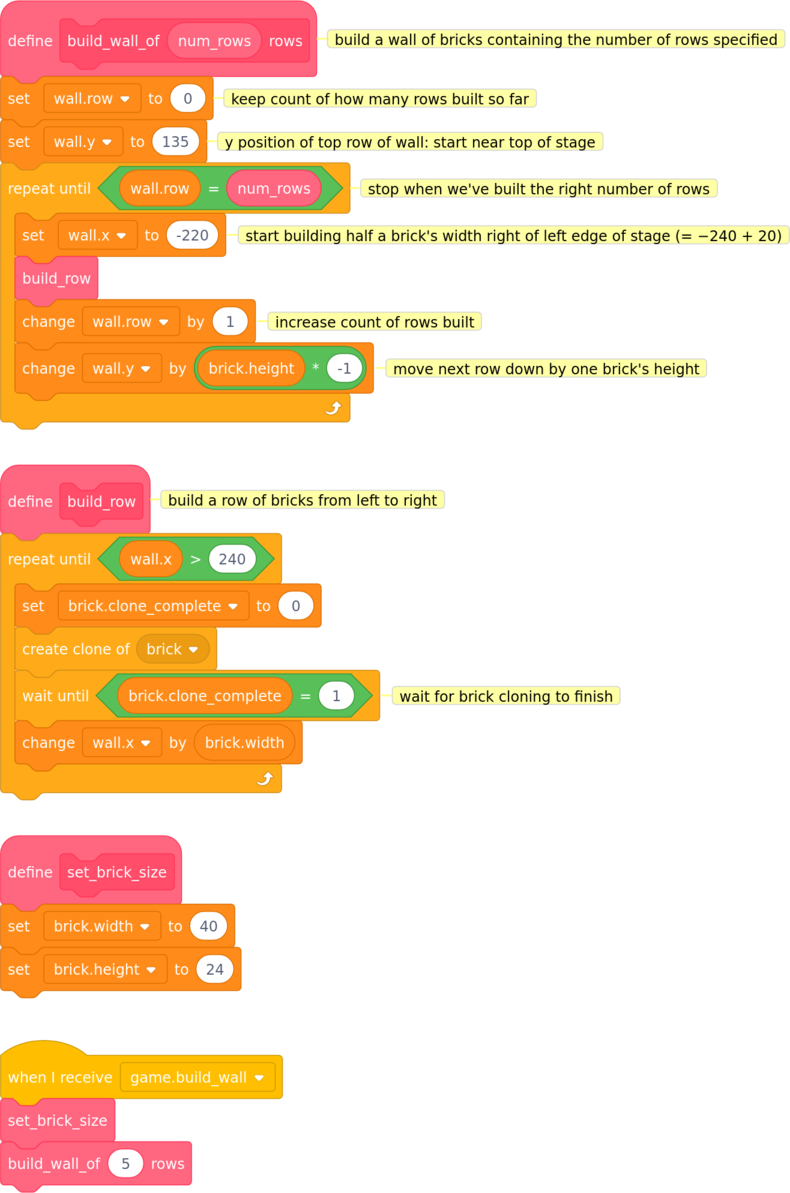
As I mentioned above, I moved the set wall.x and set wall.y blocks out of build_row. This makes build_row more flexible: it can now start building at any point on the stage we want. We just set wall.x and wall.y to the start position before we call it.
Note: it is possible to have more than one parameter (input) to a block. We could also make the starting y position of the wall an input, for example 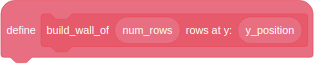 . I chose not to use multiple inputs to keep my explanation simpler, but feel free to use them if you like.
I have also created another variable named wall.row (only for the wall sprite) to keep count of how many rows have been built so far. Every time I call build_row I increase the counter by 1. I use a block which compares the counter with the number of rows the block was asked to build (passed in as the input num_rows when the block was called); when the counter reaches num_rows it stops building.
I decided to build my wall from top to bottom, which is why I have to change wall.y by brick.height * −1: I need to subtract one brick’s height from wall.y to move down the stage. It doesn’t matter whether you choose to build your wall from top to bottom or the other way around. If you build from bottom to top, you’ll need to start further down the stage to leave enough room but you can simply change wall.y by brick.height (no need to multiply by −1).
Here is how the resulting wall looks if I specify 5 rows:
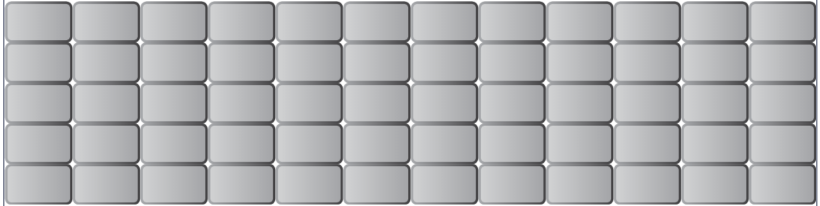
build_wall_of 5 rowsDetecting when one sprite collides with another is (in theory) straightforward in Scratch, as we have a number of blocks in the  category to help us, in particular
  and
and ![]() . To detect when the ball falls into the water we will use
. To detect when the ball falls into the water we will use ![]() .
.
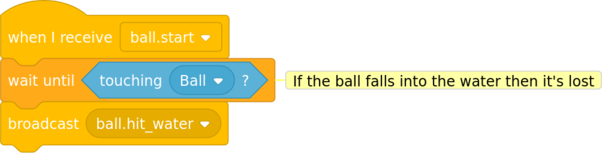
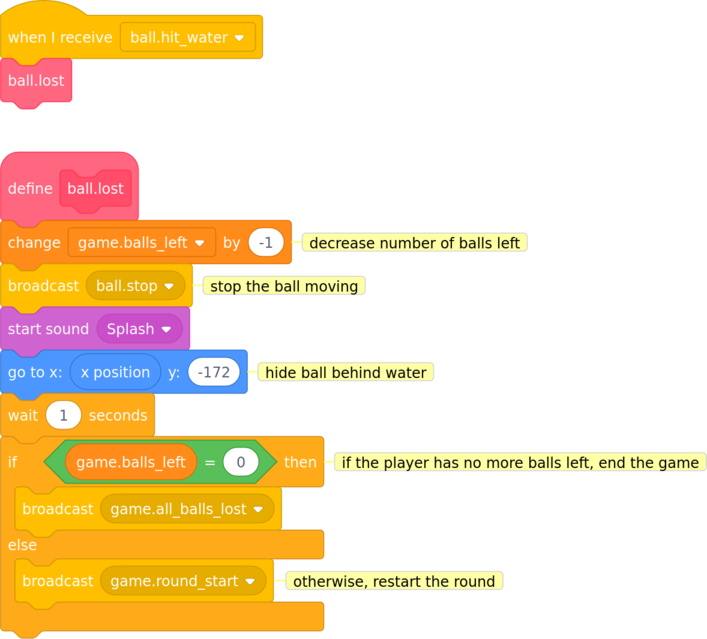
What should the game do when the ball falls into the water? Well, we know that the player will lose the ball, but we don’t need to worry about the details just yet. To begin with, let’s simply broadcast a message to tell the other sprites (and the stage) what has happened: I called the message ball.hit_water.
Write the code to detect when the ball falls into the water and broadcast a message when it does. It doesn’t matter whether you put your code into the ball or water sprite — I chose to put mine into water.
In the water sprite:
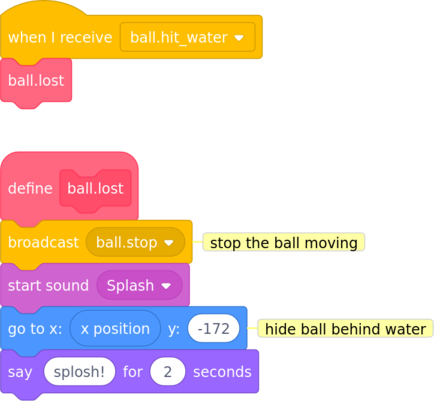
Next we need to decide what the game should do when the ball does fall into the water. My code keeps it very simple, but there is plenty of opportunity here to use your imagination, so let’s see what you come up with.
In the ball sprite:
In the stage:
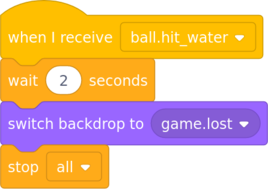
Time to test your code: does it detect when the ball falls into the water and show the “game over” backdrop?
We know how to detect when one sprite touches another. But should we put the detection code in the bat sprite or the ball sprite?
Well, it’s the ball that has to take action (change its direction), but actually it doesn’t matter where we put the collision detection code if we make use of messages. I decided to put my code in the bat sprite; it seemed tidier that way, as the ball sprite will probably end up with more code in it (because the ball can hit a lot of different things, and has to start and stop etc). So I detect the collision in the bat sprite and broadcast a message when the ball hits it.
Why bother with messages? Why not just get the ball to detect when it hits the bat and then change its direction? That would work, but there are several other reasons why I chose to broadcast a message:
It’s more flexible: a message can be picked up by any number of sprites, and each sprite can take different action in response.
It keeps the collision detection code block small, simple and readable. In coding, simple is usually preferable: simple code is easier to read and understand, and there is less chance of bugs.
It separates the collision detection code from the action taken as a result. So it will be easy to change the game’s behaviour later without changing the collision detection code.
We can now add our collision detection code to the bat sprite without having to worry about what the ball should do (we will deal with that problem next).
Note: I encountered another race condition bug while writing this code. My code is supposed to start when it receives the ball.start event and keep running until the ball stops moving (detected by checking the state of the ball.in_motion flag). However, I found that the repeat until ball.in_motion = 0 block ran before the ball sprite had had time to set the ball.in_motion flag to 1, and was therefore exiting immediately, which meant that the bat didn’t detect any collision with the ball.
Once I realised what was going on, the fix was simple: get the script to wait for the ball.in_motion flag to be set before entering the loop.
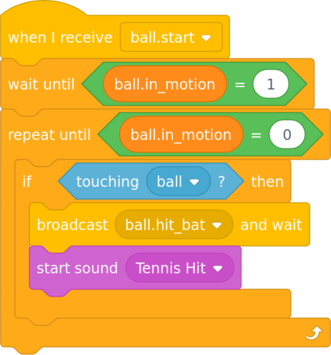
Once the ball starts moving, keep checking if it touches the bat. When it does, broadcast the message ball.hit_bat. I also added a simple sound effect.
Test that the ball detects when it hits the bat and plays the sound.
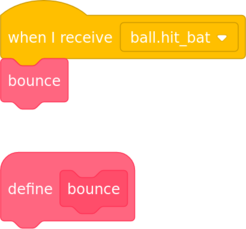
Now we can move on to thinking about how the ball should react. We know we want the ball to “bounce” or “reverse direction” in some way, but don’t yet know how. This often happens when we write code, so let’s use a technique that programmers often use in this situation: we’ll define a block named bounce but leave the definition empty.
At first glance that might seem odd to you: after all, an empty block doesn’t “do” anything. But this technique has several advantages:
We can concentrate on solving one problem at a time.
We can lay out the outline structure of our code without worrying about the exact details until later. In other words, we can say roughly what we want the code to do before we think about how.
It encourages us to write small blocks of code that do one specific thing.
In this project there are other sprites the ball can bounce off. Perhaps the bounce code can be shared?
With that in mind, let’s write our template for the “bounce” code in the ball sprite.
So far, so good. Now let’s think about how the ball will bounce.
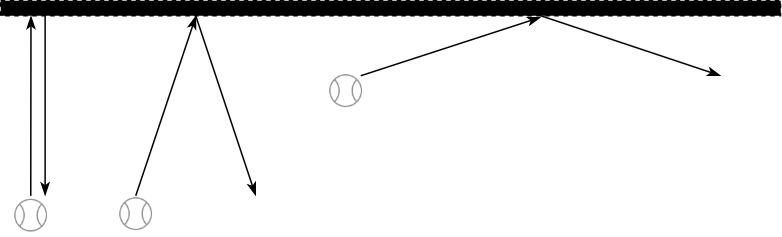
Have you ever stood in front of a (flattish) wall and thrown or kicked a ball at the wall (away from windows, of course)? If you have, you’ll have noticed that the angle at which the ball hits the wall affects the direction it takes as it bounces back.
If you throw the ball straight at the wall at right angles, it comes straight back to you (actually, you can affect that by putting spin on the ball, but let’s ignore that to keep this explanation simpler). If you kick the ball at an angle, it comes back off the wall at the same angle. Here’s a diagram showing what I mean:
In Scratch each sprite has a direction which tells the sprite which way it is facing and in which direction it will move. Scratch’s direction value is very like a compass bearing:
Here is a diagram showing Scratch Cat facing north, south, east and west.
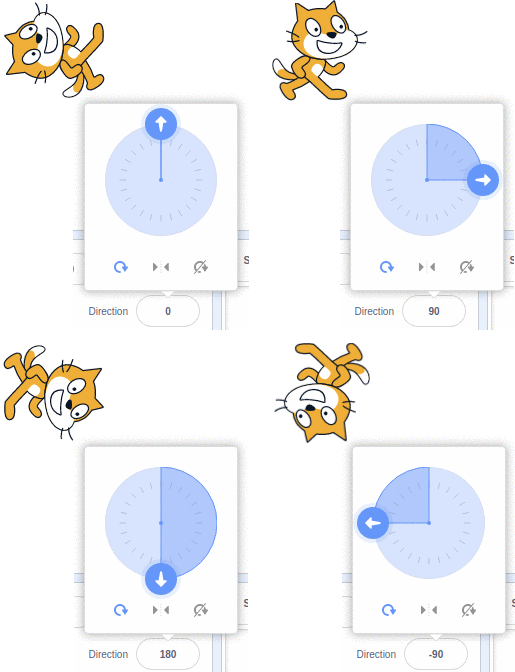
To get a better idea of how the direction value affects a sprite, try this:
Add the Arrow1 sprite from the Scratch library to an empty project and click on the Direction value.
Drag the direction arrow around and watch how the direction value and the arrow changes.
In order to calculate how our ball should behave, we’re going to need to use some geometry. If you find this section a bit difficult, don’t worry: you can always skip it and just use my code. But for those of you who are interested, I wanted to explain how the code works. So, let’s take a deep breath and dive in.
Below is a similar diagram to the “wall” diagram above, this time with the ball approaching and bouncing off the bat at different angles. For simplicity, I assume the ball is travelling down the stage and then hits the top edge of the bat. (Most of the time that’s what will happen, but it is possible for the ball to hit the sides of the bat, and even the bottom edge. But let’s worry about those particular wrinkles later.)

On the left of the diagram, the ball is travelling in a down-and-right direction (south east on a compass, direction=135 in Scratch). It hits the horizontal bat at an angle of 45° to the vertical and comes back off the bat at 45°.
In the centre of the diagram, the ball is coming down at a steeper angle (direction=160); it hits the bat at 20° to the vertical and bounces off at 20°.
On the right of the diagram, the ball is approaching at a much shallower angle (direction=110); it hits the bat at 70° to the vertical and bounces off at 70°.
Again, the ball always bounces off the bat at the same angle that it hits the bat. If you look at the ball’s starting direction and its direction after bouncing, you may notice a pattern: the start direction and direction after bouncing always add up to 180°. This gives us a way to calculate which direction the ball should travel after it hits the bat. We can describe it as: “new direction is 180 − starting direction”. And that can be translated directly into code.
Time for you to have a go!
In the ball sprite:

Now test that the ball bounces off the bat back up the stage.
When the ball hits a brick, the following things should happen:
Notice that the bouncing aspect is very similar to what happens when the ball hits the bat. Whenever our code needs to do something similar to what it’s already doing, we should think: can I reuse my existing code? We already wrote a block named bounce in the ball sprite which tells the ball how to bounce off a horizontal surface: we can probably reuse it again here.
This is a principle known as DRY which stands for Don’t Repeat Yourself. It states that rather than repeating sections of code, we should put the repeated code into a reusable block and call that block each time it’s needed.
The code to detect when the ball hits a brick must go in the brick sprite. There are many copies of brick and if we used the sensing block  in the ball sprite, the ball wouldn’t know which of the many copies of
 brick it was touching. If we place the sensing block  in the
 brick sprite, each individual brick will share that code and so it will be able to tell when it has been hit by the ball and act accordingly (e.g. change its costume to indicate that it’s broken, and then delete itself).
When the brick disappears, we also need to check if it was the last brick. If it was it would mean that the player has won the game, or the round if we extend the game to have multiple “levels”, and so we need some way of telling if this brick was the last brick and a way to notify the game if it was.
You probably won’t be surprised to learn that my solution to the second part is to broadcast a message: I named it game.round_completed. (I anticipate we may need more messages that relate to the game as a whole, hence I’m starting the message name with game.)
Again, I have provided some further hints in case you get stuck:
To answer the question “has the last brick been broken?” we first need to ask “how many bricks are left?” And the obvious solution to that is to count them.
When we build the wall, we could count how many bricks we use; and every time the player knocks out a brick, we could decrease the count by 1. When the count reaches zero, there are no more bricks remaining and the player has won.
First, update the wall building code to keep track of the number of bricks.
I am using a variable called wall.num_bricks to store the count of the number of bricks in the wall, available to all sprites as it will need to be decreased by the brick sprite.
Now let’s test the code we just wrote. Testing small blocks of code in isolation like this makes it much easier to find and fix bugs than if we waited until the whole program was finished.
To test my code I followed these steps:
Make the variable wall.num_bricks visible by placing a tick beside it in the variables category.
It is then shown on the stage. Drag it to a corner of the stage out of the way.
You can double-click it to change its style: mine looks like this: 
Set the wall to build just one row; click the green flag to start building the wall.
wall.num_bricks counter is correct: does it match the number of bricks in the wall? If you’re using my brick size, there should be 12.Now set wall to build 2 rows and click the green flag. Repeat the same test:
wall.num_bricks matches the number of bricks in the wall (for my brick size: 24 bricks)Repeat the same test using different numbers of rows of bricks in the wall. Does is work correctly with 3 rows of bricks? 5 rows? You should also test your code with zero rows of bricks. Does wall.num_bricks equal zero as it should?
Secondly, add code to the brick sprite to sense when a brick is hit by the ball and act accordingly.
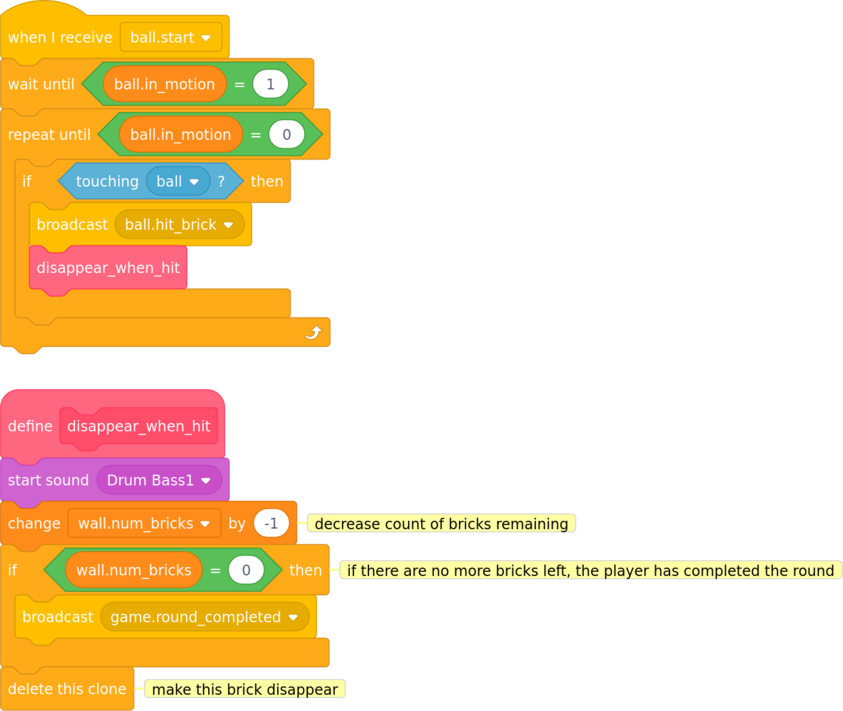
Thirdly, we need to add code to the ball sprite to make it act appropriately when it has hit a brick.
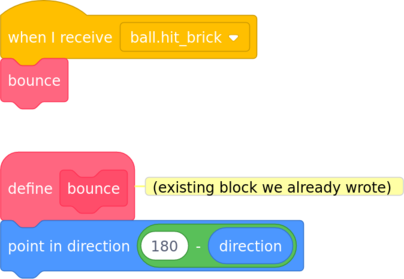
Notice that I have simply called the bounce block we wrote earlier, following the DRY principle.
Now test your code again:
Set the wall to build one row as before; click the green flag to build the wall.
Check that wall.num_bricks counter is still correct.
Start the ball moving and check that:
wall.num_bricks counter decreases for every brick knocked out of the wallwall.num_bricks reaches zero when the last brick is brokenNow set wall to build 2 rows. Again, check that the counter decreases to zero when the last brick is knocked out.
Repeat the tests using different numbers of rows of bricks in the wall.
Once you’re happy that everything is working as it should you can move on to the next section.
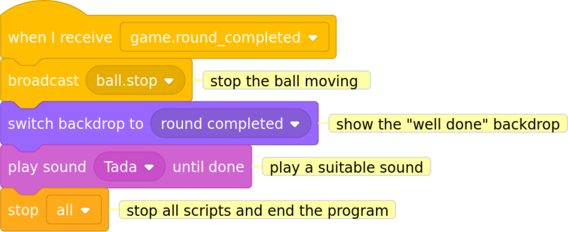
In the previous section we already wrote the code that detects when the last brick is knocked out of the wall, and if so, broadcasts a message. We now need to write the code to listen for that message and act accordingly.
Write your code to listen for the game.round_completed message and then inform the player that he/she has completed the round. As this code relates to a game event, I put my code in the Stage. I have kept it fairly simple, but feel free to get creative and extend this however you like.
The easiest way to test that your code works is to set the wall to build only one row of bricks, then play the game and knock out all the bricks. If you’re having difficulty, you can always reduce the value of ball.speed to slow the game down.
That’s it! We have completed the basic version of our game, so well done for making it this far. As it stands the game is quite fun to play (well, I think so anyway) and we can make it harder (or easier if you prefer) by simply tweaking a few values in our code.
For example we could:
add more rows of bricks to the wall by changing the value of the num_rows parameter we pass to the build_wall_of n rows block in the wall sprite
make the ball move faster by changing the value of the ball.speed variable
make the bat smaller by changing the size of the bat sprite (original size = 90)
move the wall further down the stage and/or the bat further up the stage so they are closer together, which would give the player less time to anticipate where the ball will go. (original wall start at y=135, bat y=-135)
If you’re interested in improving the game, read on for some more ideas and challenges.
This chapter contains a number of challenges to add new code and new features to the game. The first few challenges are linked from the main text, but the later ones stand alone.
When launched, the ball always starts moving in the same direction, which can make the gameplay almost identical each time it’s played. This means the game can quickly become tedious and samey for the player. It would be much more interesting if the ball started off in a different direction each time it’s launched, so let’s introduce some randomness to the ball’s starting direction.
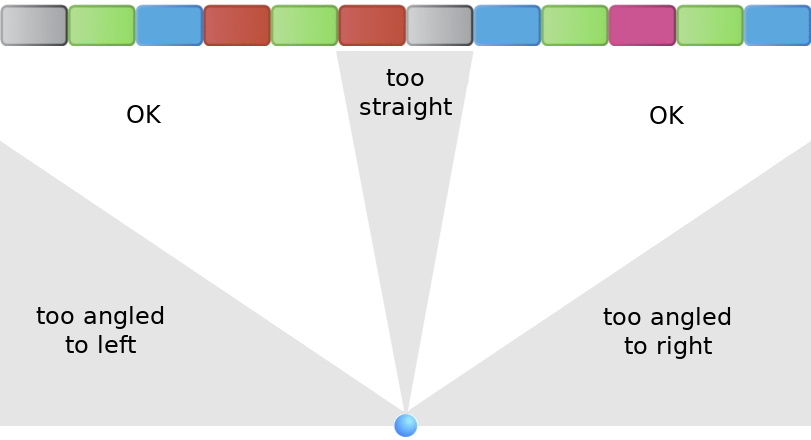
We need to be careful not to make it too random. If the ball launched straight up, it would bounce vertically up and down all day and the player could never complete the round. Likewise, if the ball launched horizontally, it would bounce left and right all day, never hitting any bricks (or the bat) — the player would be left as a spectator. So we need to limit the range of starting directions we allow. We want the ball’s starting direction to be somewhere between “up and left” and “up and right” but not “straight up”.
Add some code to choose a (sensible) random starting direction for the ball. I have provided some hints if you need them. Click or tap on each hint in turn until you find one that (I hope) helps you. I’ve given you the first hint for free.
Hint 1: I strongly suggest you create a block to hold this code.
Recall that direction 0 in Scratch means straight up (refer to the section Direction in Scratch for more detail). Direction −90 means left; direction 90 means right.
Use these numbers to decide on a sensible range for your starting direction: what is the most left-ish direction you will allow? And what is the most right-ish?
Use trial-and-error testing in Scratch to experiment: set the ball’s direction manually to the value you want to test and start the game. Is the game playable with that starting direction? Is is too hard? Is it fun?
Once you’ve decided on the outer limits of the range of directions you will allow, think about what directions are too straight up and down. Again, experiment by setting the ball’s direction and starting the game.
After some trial and error, I decided that the most left-ish direction I will allow is −65 and the most right-ish is 65. I then decided that anything between −15 and 15 is too straight to be allowed.
You may well decide on different numbers, but if you treat the up and left and up and right directions the same, you will end up with the left limit being the negative (the equivalent minus number) of the right limit as I have.
You’ll need to use the  block in the
  category to obtain a random direction.
There a couple of different ways you could approach this.
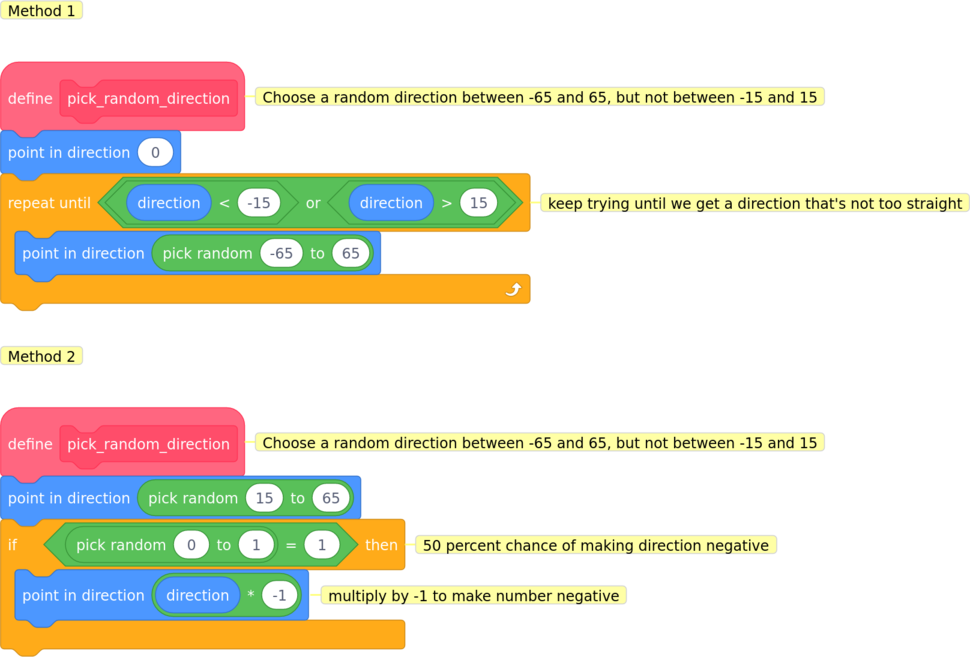
You could pick a random number between the outer limits you have chosen and then adjust it if it’s too straight.
You could choose a side, left or right, and pick a random number between the straightest direction allowed and the most angled. For example, if on the right side the allowed direction is between 15 and 65, you could pick a random number between 15 and 65; let’s say for example 27 is chosen. Then choose at random whether to keep the number positive or make it negative, in other words whether to keep it as 27 or make it −27.
I have included example code for both options below.
Use the  block in the
  category to set the ball’s direction. To check what direction it has, use the
  block.
Testing code that generates random numbers can be tricky because it behaves differently each time it’s run. I found the simplest way to test my code was to select the ball sprite, click the green flag to start the program and watch the direction value change. I tested my code at least ten times to make sure that the ball’s direction value always fell within the range I had chosen.
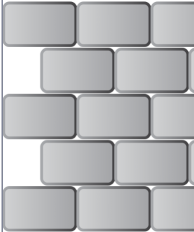
I want to “stagger” or offset alternate rows of bricks in the wall by half a brick’s width so that each brick overlaps the join between the two bricks below it. It would then look more like a real wall and would also make the game more challenging, as the player would have to knock out the “half” bricks at the edges of the stage. I want it to look something like this:

This challenge has two main problems to solve:
I think the second problem is harder than the first so I’ve provided some hints below, beginning with a subtle hint and ending with a more directly helpful one. Expand each hint (by clicking or tapping on it) in turn until you feel confident to try coding your solution to the challenge. If you get stuck, I’ve provided my solution below.
One way to tell if a number is odd or even is to use the mod operator. mod (which is short for modulo by the way) means “divide and give me the remainder”.
For example, 7 mod 2 means “divide 7 by 2 and give me the remainder”: 7 ÷ 2 is 3 remainder 1, so 7 mod 2 is 1.
For 2 mod 2, 2 ÷ 2 is 1 remainder 0, so 2 mod 2 equals 0.
Look at the following sequence and see if you can spot the pattern:
0 mod 2 is 01 mod 2 is 12 mod 2 is 03 mod 2 is 14 mod 2 is 05 mod 2 is 1I’m sure you spotted that even number mod 2 = 0 and odd number mod 2 = 1.
Our code knows how many complete rows we have built so far, and which row we are currently building. If we want to offset every alternate row, we could check if the row we’re building is odd-numbered or even-numbered and only offset the odd-numbered rows.
We already have a counter wall.row which counts the number of complete rows we’ve built so far. Before we start building, wall.row is zero; after the first row of bricks is laid, we increase wall.row to 1. It stays at 1 while we are building the second row; after the second row is complete we increase it to 2. And so on.
We can use this counter to work out if we’re about to start an odd-numbered or even-numbered row and act accordingly.
My first try was to start building odd-numbered rows half a brick’s width to the right of the usual place. But that left a hole in the left side of the wall which was not what I wanted:
I had introduced a bug in my code and I needed to fix it.
For my second try, I started odd-numbered rows half a brick’s width to the left of the usual position. So instead of starting at x position −220, I started at x = −220 − 20 (because 20 is half the width of our brick sprite). In Scratch code, I used this expression to caclulate my starting position:

Note that this means my starting brick will have its centre at the left edge of the stage. Scratch is actually quite happy with this: the brick will be placed but only the right half of it will be visible, which is exactly what I want.

The first row of bricks starts at the left edge of the stage (x=−220). The second row starts half a brick’s width to the left of the edge:
Let’s give the player a better chance of knocking down the whole wall by giving them three balls (or “lives”) to start with. When the first ball falls into the water, it’s lost and the player will then have two balls remaining, and so on. The game is lost when the player loses their last ball in the water.
This challenge has two parts:
Add some code to keep track of how many balls the player has left and only end the game when the last ball is lost. For now, don’t worry about how to inform the player — we’ll look at that in the next section.
I have provided some hints if you need them. Click or tap on each hint in turn until you feel confident enough to write your code.
Make use of the existing messages/events we have already defined. Use them as “hooks” to hang your extra code onto.
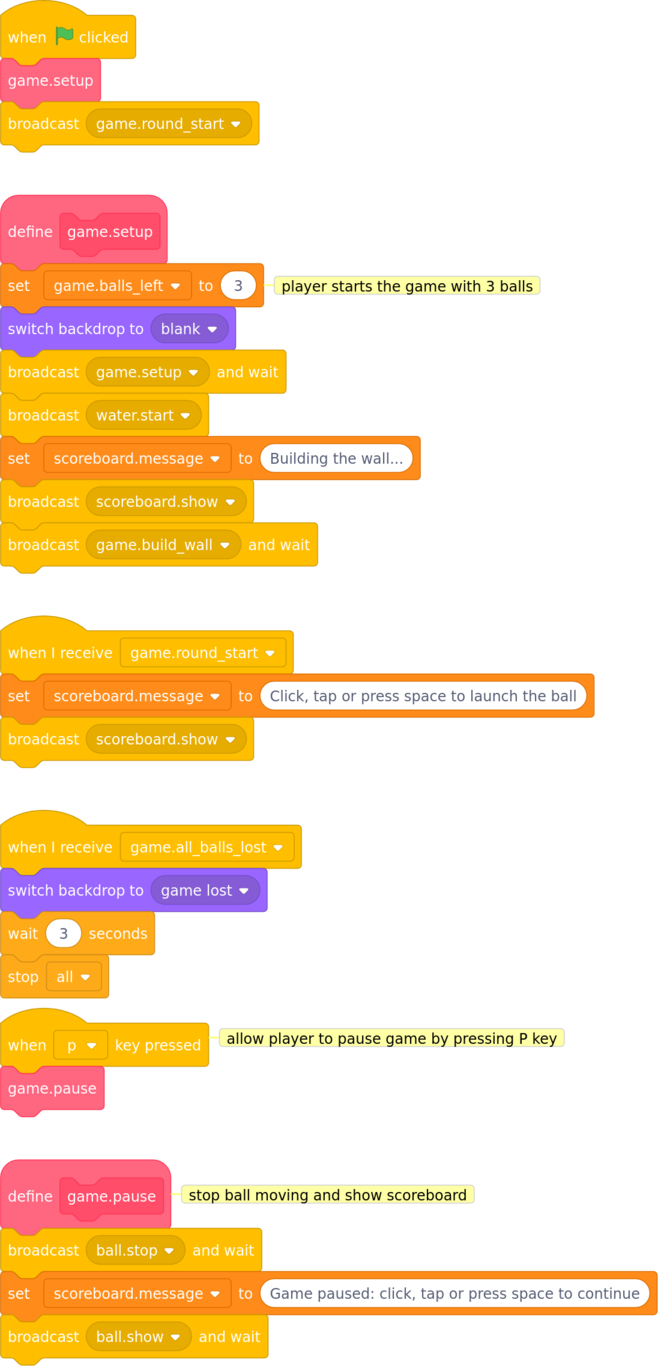
Use a variable to keep count of the number of balls the player has left. I named it game.balls_left because it belongs to the game as a whole rather than an individual sprite. It will need to be available to all sprites.
Recall that there is a message (event) game.setup which is broadcast when the game’s setup code is run. This is an ideal place to set the starting value of your variable.
The event ball.hit_water used to signify that the game was lost. As the player now has more than one ball, change the “player has lost the game” code’s  hat block to respond to a new message (I called it
 game.all_balls_lost).
The ball.hit_water message is broadcast when a ball falls into the water. What do we need to do with our “how many balls are left” counter when this happens? What if the lost ball that was the player’s last ball?
In the stage:
In the ball sprite:
When testing your code, remember that you can display variables on the stage by ticking the box to the left of them in the category. This will allow you to watch your “count of balls remaining” variable as your code runs.
We now need to find a way to display how many balls the player has left. Scratch is quite limited in how you can relay information back to the user. We can
use a  or
or  block to get a sprite to display a short string of text.
display the value of a variable (as a number or text); Scratch has three different styles of display: right-click or long press on the displayed variable to change its display style. Scratch calls the display of a variable on the stage a stage monitor. (The slider style is useful for allowing the player to adjust the speed of the ball.)
The simplest solution I could think of was to name my counter variable as I wanted it to be displayed (e.g. balls left), drag it to the corner of the stage and leave it there all the time. That has the advantage of being very easy to implement: I wouldn’t even have to write any code. The disadvantage is that it would be hard to extend it to display more information later on.
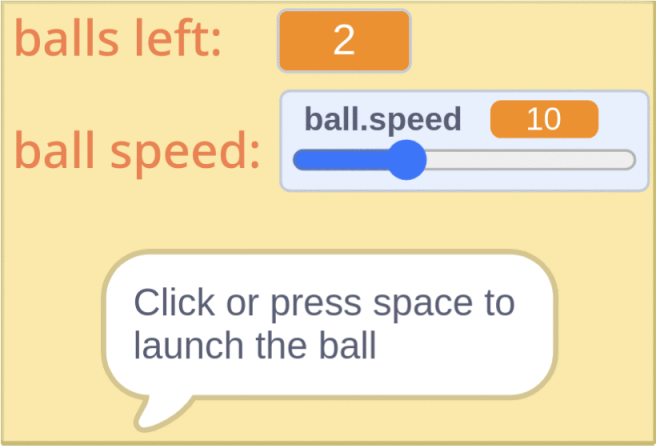
I found it quite tricky to come up with a better way to inform the player how many balls they have left. I had in mind some kind of scoreboard display which could be extended later to show more information such as number of balls left, ball speed, score etc. There isn’t room for it on the stage, so I decided that the scoreboard should only be shown when the ball is not moving, during the breaks in play.
This idea has the advantage of flexibility: it can be extended later to show more information. But the downside is that it’s a bit more complex: the more complex it is to implement, the more likely we are to introduce bugs. After weighing up the pros and cons, I decided the the extra flexibility was worth the slightly more complex code.
You may well have a better idea of how it could be done. If so, go ahead and try to code it. If you need some ideas, take a look at my design below.
My solution (which is by no means the only way, and may well not be the best way) was to make a sprite that looks something like a scoreboard. The scoreboard could display game information such as how many balls are left and also use the say block to give the player short messages or instructions. The actual message shown will be controlled by another variable named scoreboard.message.
In order to have fine control over the positioning of the speech bubble when the sprite “talks”, I added a second sprite (its costume is a single black pixel) which I made invisible by setting its ghost effect to 100 in code. This sprite is what does the talking: it contains the instructions. By moving this scoreboard_message sprite around, I can position the speech bubble anywhere on the stage.
I added static text to the scoreboard’s costume so that it contains the headings that won’t change. I then set the variables I wanted to display to visible (by ticking them in the category) and dragged them to the right place on the scoreboard.
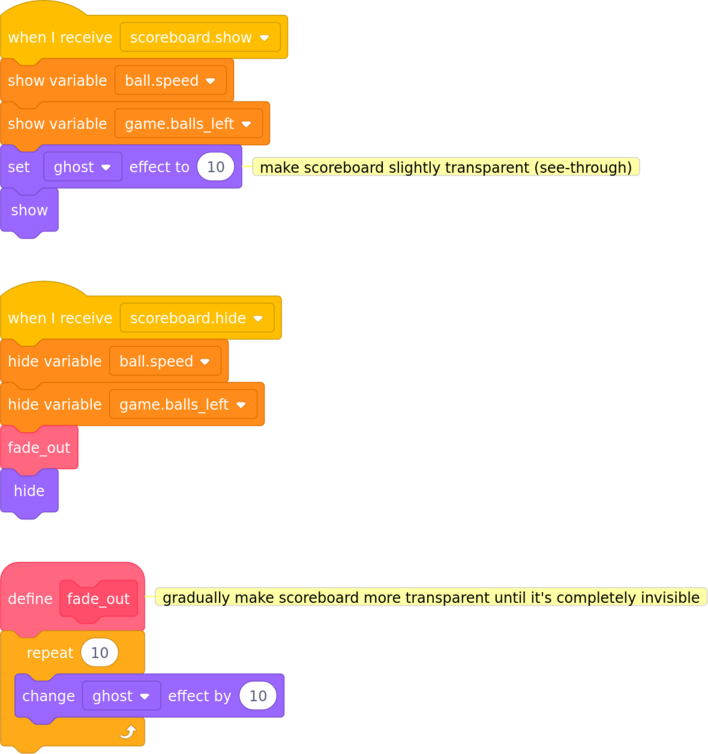
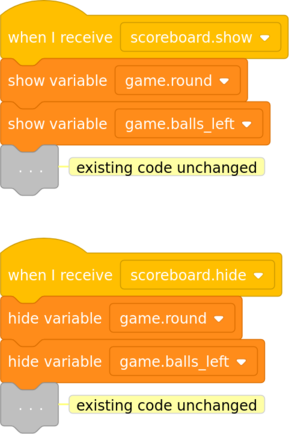
Because we can show or hide variables in code, I can completely hide the whole scoreboard while the ball is in play. All I need to do is to make all the elements of the scoreboard (the scoreboard sprite, the scoreboard_message sprite and the displayed variables) respond to show and hide messages. I named the messages scoreboard.show and scoreboard.hide.
In the scoreboard sprite:
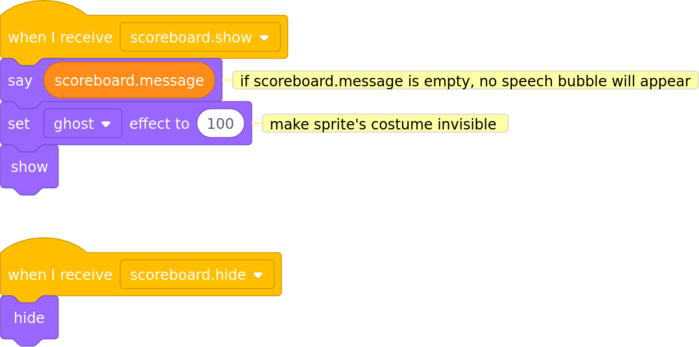
In the scoreboard_message sprite:
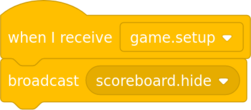
In the stage:
As always, test your code to check that it does what you intend it to do.
As it stands the game is short and relatively easy to complete. To make our game more interesting and challenging for the player, let’s introduce several rounds of play: once the player has demolished the whole wall, the game should display a “well done” message and then move on to the next round. As the player progresses through the rounds, the game should become progressively more challenging.
The first question is: how does moving on to the next round affect the gameplay? Well, we want each round to be more difficult than the last so I suggest that for each round:
Thanks to the flexible way we’ve coded our game so far, these should be easy to achieve in code: the wall sprite already has a build_wall_of (num_rows) rows block, so we just need to tell it how many rows of bricks to build for each round. Likewise, the speed of the ball is controlled by the ball.speed variable, so we just need to increase this value for each round.
The next design decision is how easy or difficult to make the game. If we want our game to appeal to the widest number of players, we need to accommodate a range of skill levels. Therefore I suggest we also introduce a difficulty setting to our game: we allow the player to choose between easy, medium or hard. The player’s choice will determine the game’s starting level of difficulty.
For the wall, I suggest that on the easy difficulty level we opt for the easiest possible game in round 1: start with just one row of bricks and the ball moving slowly. Then for each subsequent round we add one more row of bricks to the wall and (gently) increase the speed of the ball. On medium and hard difficulty settings we could start round 1 with more rows of bricks in the wall and a slightly faster ball speed.
After some trial and error testing and asking a few people to play the game while adjusting the settings, I ended up with this design:
| Round 1 | Each subsequent round | |
|---|---|---|
| Easy | 1 row of bricks ball speed: 5 |
1 additional row of bricks ball speed: increase by 2 |
| Medium | 1 row of bricks ball speed: 10 |
1 additional row of bricks ball speed: increase by 2 |
| Hard | 1 row of bricks ball speed: 15 |
1 additional row of bricks ball speed: increase by 2 |
So on easy difficulty:
On medium difficulty:
On hard difficulty:
I initially decided that on hard difficulty the wall would start with 2 rows of bricks, but that creates a problem: what if the player pauses the game mid-round and changes the difficulty setting? It would be difficult to insert another row of bricks into a partly demolished wall half-way through a round. I decided to side-step this complication and keep it simple: start with one row of bricks and add one more per round.
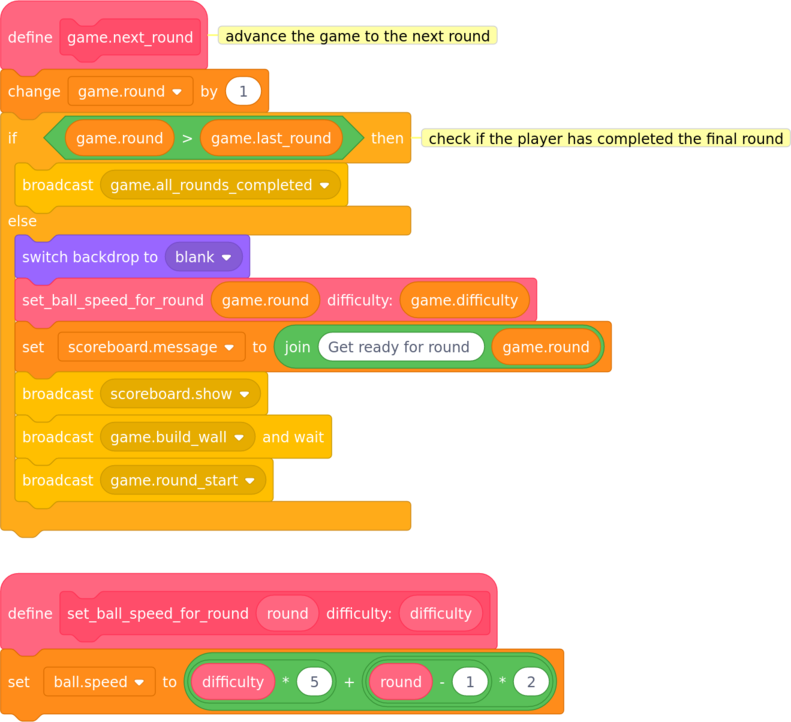
The ball speed values that I have chosen can be calculated via a single formula. If we assume that the difficulty level is assigned to a variable (I called it game.difficulty) where easy has the value 1, medium is 2 and hard is 3, then we can say:
set ball.speed to (game.difficulty * 5) + ( (round - 1) * 2)
I have already decided to represent the difficulty level in my program as a number from 1 (easy) to 3 (hard). But how should we get this information from the player?
One solution could be to use an  block: that would be simple and easy to implement. We would need to check the player’s answer to ensure that it is one of our allowed values (in coding we call this validation), but this would not be too hard to achieve. The solution could look something like:
repeat until we get a valid response:
    ask [What level of difficulty (1 for easy, 2 for medium, 3 for hard)?]
    set difficulty to (answer)
end repeat
However I decided to not to use an ask block but instead use radio buttons: a set of buttons of which only one can be selected at once (they are sometimes known as option buttons).
One advantage is that radio buttons are familiar to most computer, tablet and smartphone users. You will almost certainly have seen options like this on web pages:
Another advantage of radio buttons is that we don’t need to validate the input as the user can only select from the options we have provided. The main disadvantage is that they are not built in to Scratch, so we will have to implement them ourselves.
In this case I decided the extra complexity was worth the trouble to achieve a more polished user interface. I also think it’s a useful demonstration of a component that you can re-use in your own Scratch programs (see the standalone radio button component projects if you want to do this).
buttonSet.difficulty spriteThis section details the design of the ‘radio button set’ sprite. I’m not necessarily expecting you to be able code this yourself, but I wanted to explain its design and how it works. Please don’t worry if you don’t understand it immediately as it’s not crucial to building the game.
I created a sprite which shows all the buttons in the set: in this case one button labelled easy, one labelled medium and one labelled hard. The sprite has one costume for each possible selection: one costume showing easy selected, one showing medium selected and one showing hard selected.
I will use the x position of the mouse pointer at the time the user clicks the sprite to work out where on the sprite the user has pressed. If I know how wide the buttons are, I can then work out which button in the set the user has clicked on.
I made all the buttons the same width and spaced them equally in order to make the calculation as simple as possible. For my set of three buttons I divide the width of the sprite into three equal thirds:
The image below shows the sprite’s three different costumes:
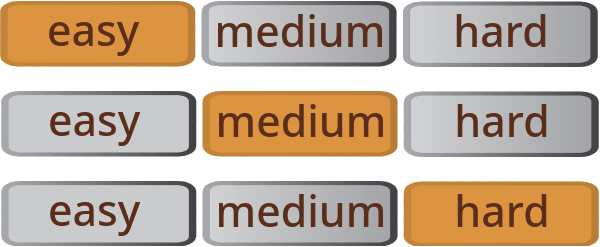
buttonSet.difficulty sprite’s costumesI use internal variables to store the width of each button (button_width) and the width of the whole set of buttons (buttonSet_width). Before I use the sprite for the first time, I call its setup block to set these values. (I actually scale these widths in proportion to the sprite’s size value: that way, I can resize the sprite without having to change my calculations of where the user clicked.)
I also use an internal variable named selected to keep track of which option is selected: 1 for the first option, 2 for the second, and so on.
To indicate to the user which option is selected, we simply change the sprite’s costume: the first costume for option 1 (easy), the second costume for option 2 (medium) and so on.
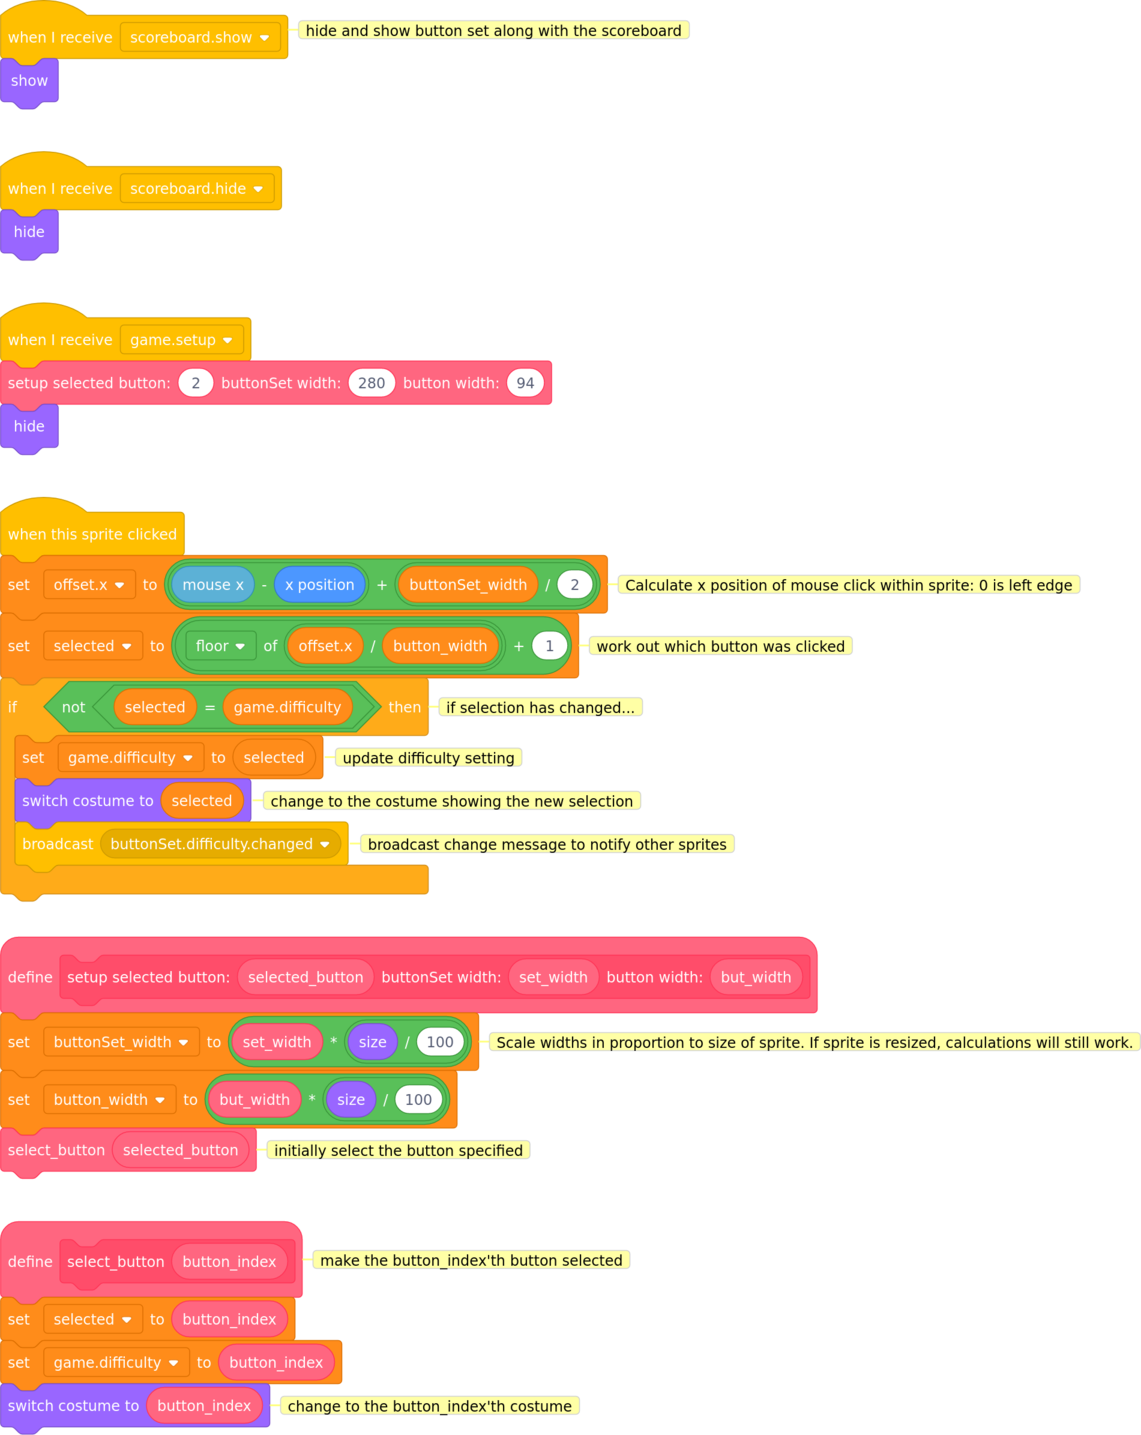
Once the button set has been initialised by calling the setup block, the flow of the code is fairly straightforward.
When the sprite is clicked:
Work out the x position of the click within the sprite (use 0 to mean the left edge of the sprite)
Divide this position by the width of one button (ignore anything after the decimal point – just take the whole number).
For our set of 3 buttons, this will give us a result of 0, 1 or 2 meaning the left, centre or right button was clicked respectively.
Add 1 to this value to obtain the number of the option that was selected.
If the selected button has changed:
game.difficulty so that the other sprites know which option is selectedI have included the code here for you to refer to, but it is available in the extra sprites for Demolition Challenges project so feel free to copy the whole sprite including its code into your project via the backpack at the bottom of the Scratch screen.
buttonSet.difficulty code:
I tested my code by making the sprite’s internal variables and the game.difficulty variable visible on the stage by ticking the box to the left of them in the category, then clicking at various locations on the sprite and checking that the correct option was selected. I also tested that clicking outside the sprite did not change the selection.
In addition to the game.difficulty variable, we also need to create a couple of other new variables (accessible to all sprites):
game.round to record which round is currently being playedgame.last_round to indicate the last round of the game: if player completes this round, they have completed the gameCreate the variables and set their initial values (the obvious place to initialise them is in our game.setup block).
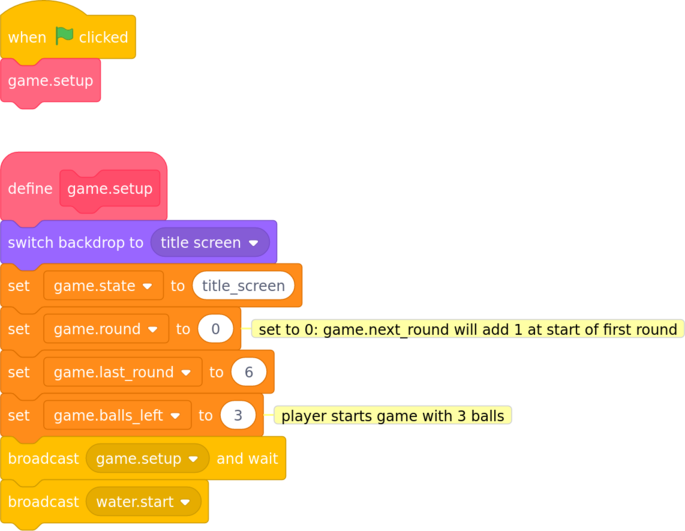
Next, we need some code to move the game on to the next round once the player has demolished the wall: I called this block game.next_round. We’ll need to move some code from game.setup into this block, as some of the steps need to happen before every round.
Try to write the code for the game.setup block. If you get stuck, have a look at the hint below or read through my code below and try to follow what it’s doing.
We also need to add the following steps to game.next_round:
Increase the game.round counter and check if the player has completed the whole game
if so, broadcast a message: I called it game.all_rounds_completed
if not, while the wall is building, let the player know (via a message on the scoreboard) which round is about to start
Set the value of ball.speed using the formula we wrote above
stage:
Because we are not yet calling this block anywhere in our code, I tested it by dragging the game.next_round block to an empty part of the stage’s code (on its own, not attached to any other code) and clicking it to run the block. Check that game.round is increased when the block is run and that the code correctly recognises when it moves past the final round.
Next we need to adjust the wall code to build the right number of rows of bricks for the upcoming round. As I decided to have the same number of rows of bricks as the number of the round, this is very simple. Adjust your code and, as always, test that it works.
wall:
It’s just as simple to test this code: set game.round to each number in turn, run the game.next_round block and check that the wall has the number of rows you expect (one row in round 1, two rows in round 2 etc).
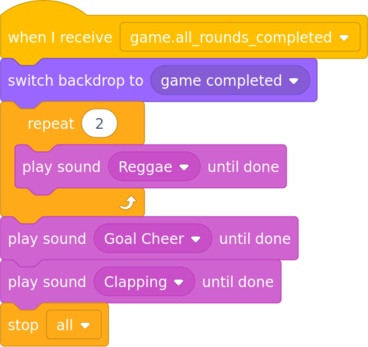
Now that we have defined the game.all_rounds_completed message which is broadcast when the player completes the game, now is a good time to write that code. As a minimum, we should probably show a messaage congratulating the player on their magnificent achievement, but how you design this part of the game is entirely up to you — make it as imaginative (or as simple) as you like. You could design a spectacular backdrop, play a tune, show an animation of a fireworks display…
Anyway, here’s my version which uses a new background named game completed (available in the extra sprites for Demolition Challenges project) and some library sounds:
stage:
To test your code, create a broadcast game.all_rounds_completed block (on its own) and click to run it.
We need a way for the player to indicate they are ready to move on to next round. My first design was to ask the player to press the n key (n for next round) and use a  block. This was simple to implement but it’s not really convenient for players using touchscreen devices to have to bring up the on-screen keyboard just to type the single letter n.
Ideally we want the player to be able to click (or tap on a touchscreen device) or press a key. If you’re thinking that this sounds very similar to how the player currently launches the ball at the start of a round or after a ball was lost in the water, then you’re thinking along the same lines as me. Could we re-use that same mechanism (and hopefully the same code) to move to the next round?
The answer is yes, but the code will need to behave slightly differently depending on where the player is in the game:
So we need a way to determine what state the game is in to know what to do when the player clicks, taps or presses space. Can you think of a way to do this?
My solution to this is to use a variable named game.state to store the state of the game. The variable will have one the following values:
title_screen: indicates the game is at the opening title screenround_start: indicates the game is at the start of a roundin_play: indicates the ball is in playpause: indicates the game is pausedround_completed: indicates the player has just completed a roundall_rounds_completed: indicates the player has just completed the whole gameall_balls_lost: indicates the player has lost their last ballTo keep my code tidy I created a block named game.continue which decides what happens in response to the player clicking, tapping or pressing space (in the stage with all the other code that relates to the game as a whole). Go ahead and create the game.continue block and add code to move the game to the appropriate state depending on the value of game.state. Then add the code to set the value of game.state when a new state is triggered.
stage to jog your memory.
The logic for this code can be written as follows:
game.state is round_start or pause then start the ball movinggame.state is title_screen or round_completed then move on to the next roundstage:
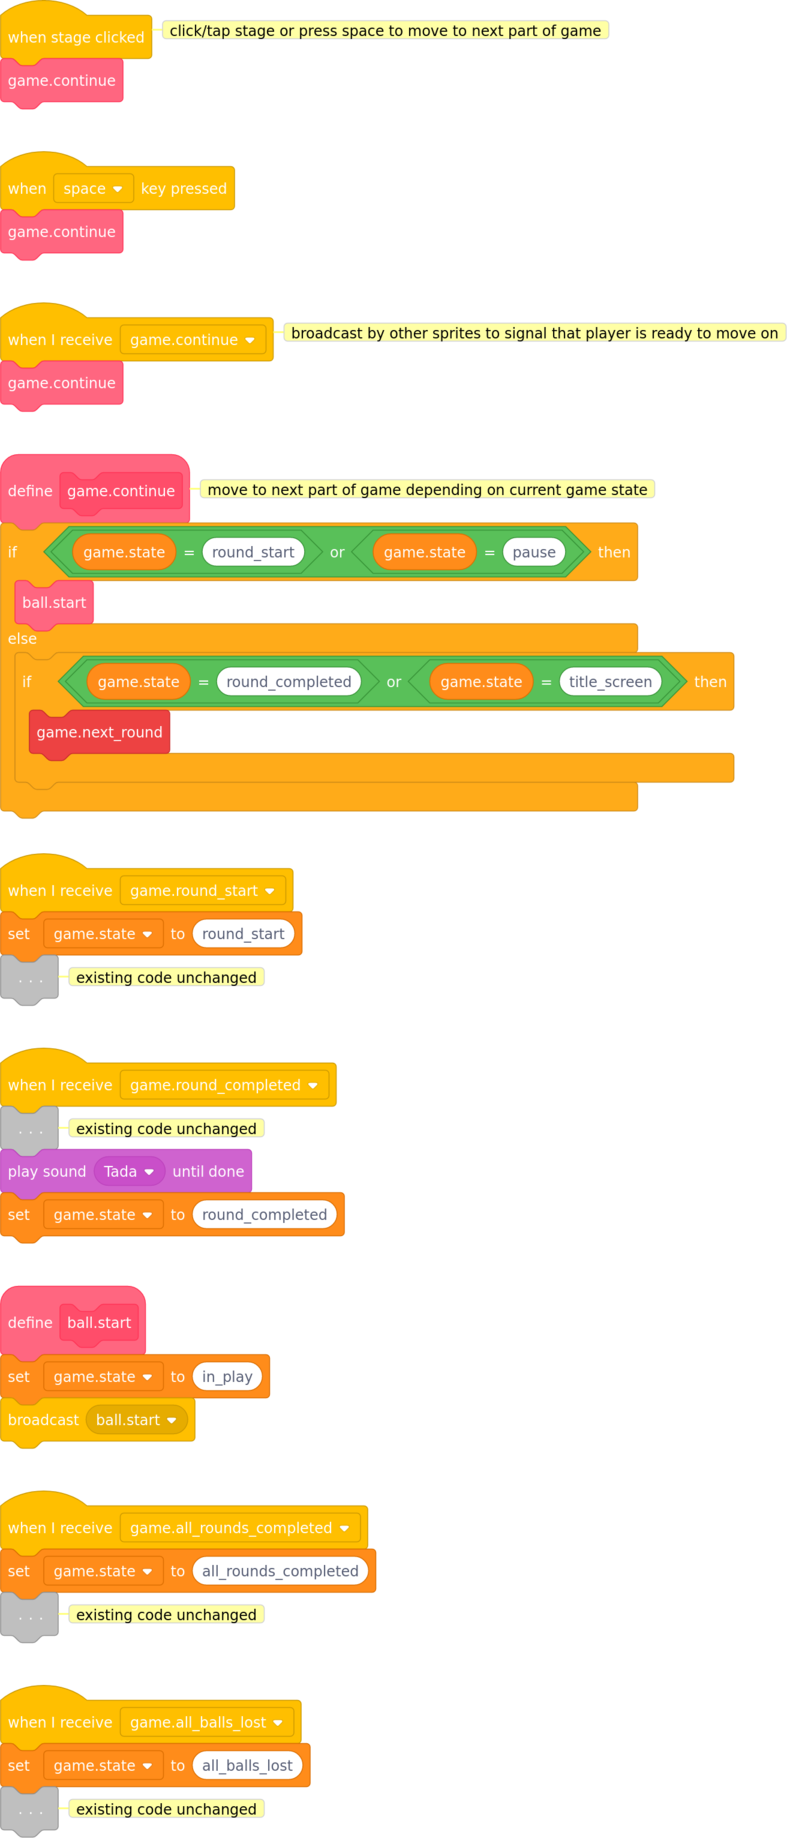
Notice that I am also calling game.continue when I receive a message with the same name. This will allow us to capture clicks/taps on other sprites (not just the stage) and have those sprites indicate that the player is ready to move on.
Here’s the code to do that:
scoreboard:
![]()
bat:
![]()
Testing this code can be tricky as it affects many different parts of the game. I made the game.state variable visible and started the program, checking that the value was what I expected when the game was in the various different states.
Remember that you can drag in a temporary  block and click it to simulate gameplay events (such as a round being completed) without having to play the game all the way through.
It was while testing this code that I found a bug: it’s possible to press p to pause the game when the ball is not in play. Doing this got the program into a very confused state as it’s not something it was expecting. Can you think of a way to fix the bug?
While I was working on the ‘pause the game’ feature, it occurred to me that only allowing the player to press p is not at all touchscreen-friendly: by the time the player has brought up the on-screen keyboard, the ball will probably have already fallen into the water.
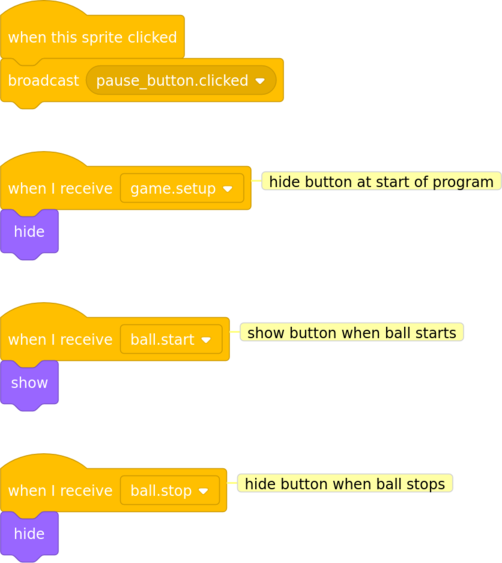
![]() It would be much easier for touchscreen users to be able to tap a pause button somewhere on the screen, so I added a
It would be much easier for touchscreen users to be able to tap a pause button somewhere on the screen, so I added a pause_button sprite at the bottom right of the stage. The costume for this sprite is available in the extra sprites for Demolition Challenges project.
In the stage:
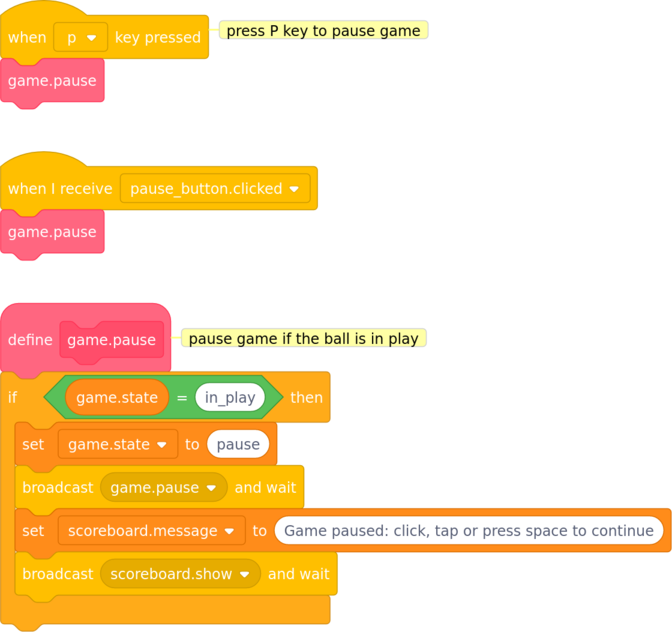
ball:
It turned out to be a simple bug fix: only pause the game when the ball is in play (if not, just ignore the request to pause).
The code for the pause_button sprite is very simple:
The final part of this challenge is to let the player know which round they are playing, and to allow them to change the level of difficulty. Let’s add both of those to the scoreboard now.
It’s up to you how you choose to arrange the scoreboard — you may need to adjust the scoreboard sprite’s costume to make it big enough to fit everything on. I decided to put the current round at the top, then the number of balls left, and then the difficulty buttons. I had to move the scoreboard.message downwards (to y position −110) to fit everything in. Scratch makes this nice and easy as we can move the various elements around on screen (either by dragging the sprites or by adjusting their x and y values).
Once you’re happy with the layout of your scoreboard, tweak its code to show and hide the new elements you’ve just added.
In the scoreboard:
There are now just a couple of loose ends to tie up:
When the player changes the difficulty level, we need to adjust the ball speed to match the new difficulty.
The bat should only be active during a round.
Tidy up the display by showing and hiding various sprites at the appropriate points in the game:
The scoreboard should be hidden at the start of the program (it is already shown when triggered by the scoreboard.show event).
The bat, ball and water should only be shown during the round; they should be hidden when we show the round completed, game lost or game completed backdrops.
In the stage:

scoreboard:
bat:

ball:
water:
While I was coding this part of the game I made one other small change which is not directly related to this challenge, but I include it here for the sake of completeness: I added some music (the Emotional Piano library sound) when the player loses the game.
In the stage:

That’s the end of the challenges section, and (sadly) also the end of the guided tutorial. If you’ve kept with it all the way to the end, thank you and well done: I hope you have found it interesting and learned a lot from it.
If you want to take the game further, read on to the next chapter for some ideas.
This chapter contains a few thoughts and ideas for improving the game.
I’m sure you will agree that there is plenty of room to improve the game’s visual appeal (as I am definitely no artist). The costumes of various sprites could be prettier, in particular the bat and bricks, and the backdrops could be made more beautiful.
If you feel the urge to have a go at improving the visual presentation of the game, I would love to see what you come up with.
In no particular order, here are some ideas for new features which could be added to the game.
Make the player hit each brick 2 or 3 times before it breaks
As the game progresses to later rounds, we could introduce gaps in the wall, either random or to a set pattern, to make it harder to predict the path of the ball.
Implement better collision detection
Allow the player to collect accessories (sometimes called power-ups) to enhance their bat’s capabilities. Accessories could include:
Introduce a scoring system
ball.speed points per brick; faster speeds would gain more pointsball.in_motion0 means is not moving, a value of 1 means is moving.
ball.speed10 is reasonable for a game that’s not too easy but not too hard.
brick.clone_completebrick sprites when I start as a clone script has completed.
wall.num_brickswall.x & wall.ybuild_row.
brick.width & brick.heightwall sprite. Record the dimensions of a single brick. Allows the wall to place individual bricks side by side and rows of bricks on top of one another.
wall.row0 before we start building; increases after each row is complete. Allows the wall to know when it has added the required number of rows and stop building.
game.balls_leftscoreboard.message block i.e. the message that will be shown to the player. See section Challenge: Give the player three balls.
game.difficulty0 for easy, 1 for medium or 2 for hard. See section Challenge: Give the game more than one round.
game.round0 in the game.setup block; increases before the start of each round. See section Challenge: Give the game more than one round.
game.last_roundgame.round is equal to game.last_round the final round is being played; if game.round is greater than game.last_round then the player has completed the entire game. See section Challenge: Give the game more than one round.
game.stateA text representation of the current state of the game. Possible values are:
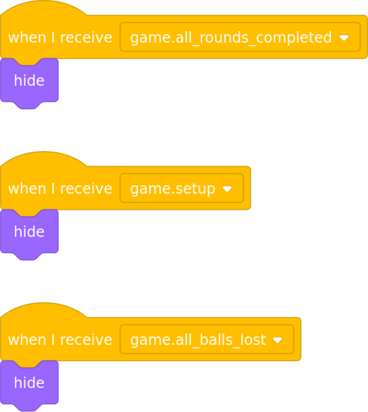
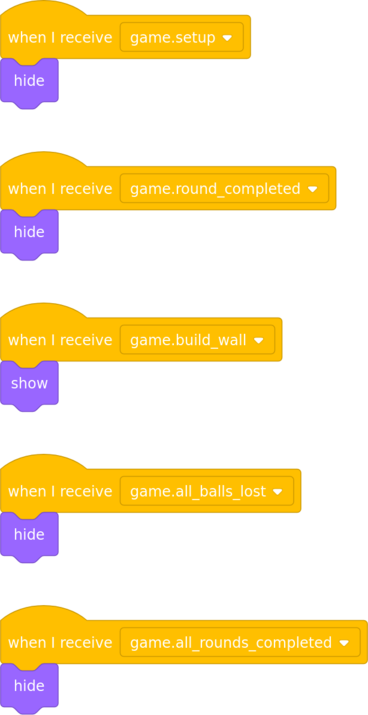
title_screen: indicates the game is at the opening title screenround_start: indicates the game is at the start of a roundin_play: indicates the ball is in playpause: indicates the game is pausedround_completed: indicates the player has just completed a roundall_rounds_completed: indicates the player has just completed the whole gameall_balls_lost: indicates the player has just lost their last ball| Message | Meaning | Broadcast by | Received by & Action taken |
|---|---|---|---|
game.setup |
program start: set up | stage |
bat: make self visible |
game.build_wall |
wall about to be built | stage |
wall: start building |
game.round_start |
round about to start or restart after ball lost | stage, ball |
ball: set start position & direction,set ball.in_motion flag to nobat: follow mouse pointer’s x position |
game.round_completed |
player demolished last brick | brick |
stage: change backdrop, play tada soundball: stop moving, hide |
game.all_balls_lost |
player lost last ball in water | ball |
stage: change backdrop, end programbrick: delete all clonesbat: hide ball: hide |
ball.start |
ball about to start moving | stage, bat |
ball: set ball.in_motion flag to yes,hide scoreboard, start moving bat: start checking if ball touches batbrick: start checking if ball touches brickwater: wait until ball hits water |
ball.stop |
ball about to stop moving | stage, ball |
ball: set ball.in_motion flag to no |
ball.hit_bat |
ball hit the bat | bat |
ball: bounce |
ball.hit_brick |
ball hit a brick | brick |
ball: bouncebrick: play bass drum sound,disappear, check if any more bricks remain |
ball.hit_water |
ball fell into water | water |
ball: stop moving,play splash sound, decrease count of balls left, check if any balls remain |
water.start |
start water wave effect | stage |
water: start wave animation |
scoreboard.show |
scoreboard to be displayed | stage, ball |
scoreboard & scoreboard_message: show scoreboard |
scoreboard.hide |
scoreboard to be hidden | stage, ball |
scoreboard & scoreboard_message: hide scoreboard |
game.all_rounds_completed |
player completed final round | stage |
stage: change backdrop, play congratulation soundsball: hidebat: hidewater: hide |
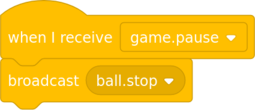
game.pause |
player has paused game | stage |
ball: stop moving |
game.continue |
player has resumed game | stage, bat, scoreboard |
stage: move on to the next part of the game (or resume after pause) |
pause_button.clicked |
player has clicked on pause button | pause_button |
stage: pause game |
buttonSet.difficulty.changed |
player has changed difficulty setting | buttonSet.difficulty |
stage: update value of ball.speed for new difficulty level |
An algorithm is a set of steps to complete a task which the computer should follow in order. For example, this might be an algorithm to describe making a sandwich:
A flag is a type of variable that has only two possible states: it is either on or off. You can think of the flag as either being up (or on, or meaning yes) or down (or off, or no).
This type of variable is also known as a Boolean variable.
,  and blocks to loop.
A parameter (also known as an argument) is a piece of information that you pass to a block of code to tell it more precisely how to behave. For example, if you created a Scratch block called say hello (n) times, n would be a parameter: the value of n tells the block how many times to say “hello”.
Scratch allows us to define our own blocks with parameters: Scratch version 3 calls these inputs to the block.
See the Scratch wiki entry for input and the Wikipedia entry for parameter.
Here is a list of resources used in this tutorial and the game. Many thanks to the authors for making their work freely available.
Scratch: the brilliant coding tool from the Lifelong Kindergarten Group at the MIT Media Lab
![]() Hint icon by Alexander Kahlkopf of iconmonstr
Hint icon by Alexander Kahlkopf of iconmonstr
![]() Note icon by Vectors Market from flaticon
Note icon by Vectors Market from flaticon
![]() Pause button by Pixel perfect from flaticon
Pause button by Pixel perfect from flaticon
Water wave sprite costume adapted from this looping water animation created by Bridgehead Productions
The title screen uses:
This document was produced using pandoc universal document converter.
The PDF version was produced with weasyprint HTML to PDF converter.
The Scratch code images were produced with ScratchBlocks.
switch costume to (index) rather than next costume in a loop
This work is licensed under a Creative Commons Attribution-NonCommercial-ShareAlike 4.0 International License.