Coding Tutorial: Creating A Calendar & Clock In Scratch

First version published
Last updated
First version published
Last updated
This is a short Scratch tutorial suitable for intermediate coders. By the end you should be able to create your own calendar and clock (with both digital and analogue displays) which continually updates to the current date and time.
For a sneak peek at what the finished program can do, see this example of a completed calendar and clock project.
OK, let’s fire up Scratch and open the template Scratch project for this tutorial.
Sign in to Scratch and then click  to create your own copy of the template.
The template project contains these sprites:
A sprite with one costume showing a simple round clock face with the numbers 1 to 12 around the edge
Very basic representations of clock hands – simple straight lines of different colours:
The key to getting the current time and date in Scratch is the sensing block current [year] and its variants.
Try dragging that block into your code area and clicking it: it should pop up the result below the block:
![block current [year]](img/current_year.png)
Change the [year] drop-down to [month] and click it again.
What is the result this time?
Now try current [date] and current [day of week].
What is the result?
Did you notice that current [day of week] returns a number? The number represents the day of the week where 1 means Sunday, 2 means Monday and so on.
We can read the time in the same way, using current [hour], current [minute] and current [second].
Try these blocks out now.
If you’re doing this in the afternoon you probably noticed that current [hour] returns the hour in 24-hour format, so if it’s (say) 3pm, current [hour] returns 15. At midnight it would return 0.
Let’s start adding code to our template project.
Firstly, let’s get the time updating on screen in digital format (i.e. as numbers rather than with clock hands). Follow these steps…
Create variables.
In the stage, create the following variables to hold the component parts of the date and time:
daymonthyearhour24 & hour12 (to hold the hour in 24-hour and 12-hour clock formats)minutesecondAs you create the variables, Scratch makes them visible on screen so you can see their values change as your program runs. This will help us when we test our code.
In the stage, make a block named get time.
Click the Make a Block button in the  category, type the name
 get time and click OK. This block will read the component parts of the current date and time and store them in our variables.
Under our define get time block, place a block to set the hour24 variable to the current hour.

Store the other component parts of the date and time in their respective variables. For example, set minute to the current minute, day to the current day of the month, and so on.
Add more blocks to set our other variables to the correct values.
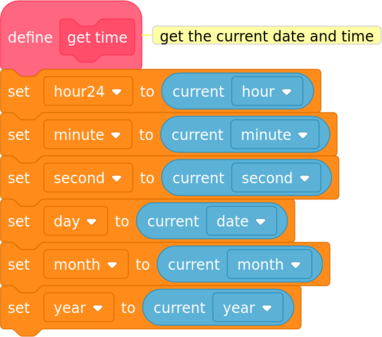
We also need to set the value of hour12 (the current hour in 12-hour-clock format): can you work out how to do this?
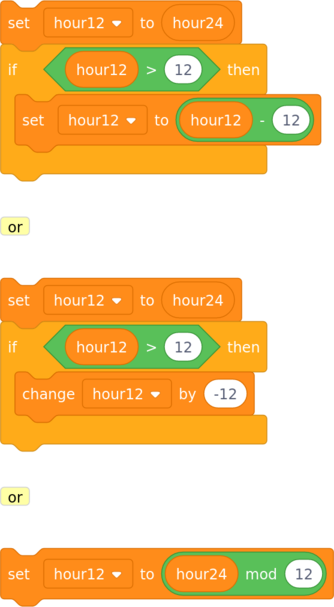
The mod operator divides and tells you the remainder:
e.g. 15 mod 12 means work out 15 divided by 12 and give me the remainder
15 / 12 is 1 remainder 3 so 15 mod 12 is 3
Test your code by clicking on your block and checking the values of your variables on screen.
Display the time on screen
Create a variable digital time 24h to hold the full time (the result of joining the hour, minute and second together). Then make a block named build digital time 24h to set its value by joining all the parts of the time together into one string of text separated by colons (or dots if you prefer).

Again, test this code. Does it do what you expect?
You may well notice a minor problem here: if either the hour, minute or second is a single digit number, the code will not add a 0 before it so the result would be (say) 9:3:7 instead of 09:03:07. How can we fix that?
My solution was to write a block to add an initial zero (if necessary) to pad a number to two digits. Have a go at writing this block which I called two digits, and use it to fix the build digital time 24h block.
Note: my block uses an input (also known as an argument) which I called num: this is the number which I pass in to the block and which the block pads to two digits. To create a block with an input, click Make a Block and give your block a name as usual. Before you click OK, click 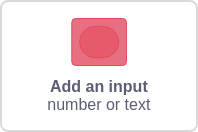 and name your input.
I also created a new variable called output for the two digits block to store its result.

Test your code again. If anything isn’t working as you expect, refine your code and try again. Keep testing until you’re happy it is working.
Now that we have the current time stored in the digital time 24h variable, simply drag this variable to where you want it to be on the stage. Set its display type to be large readout by double-clicking or right-clicking on it (so that it no longer shows the name of the variable).
Get the time to update.
Whenever we need our code to do something more than once, we use a loop. In Scratch we have a choice of three loop blocks:  ,
,  or
or  .
.
In this case, we want our clock to keep updating its display with the correct time and never stop, so the forever block is ideal.
Write a block of code which starts when the green flag is clicked and keeps updating the time using our get time and build digital time 24h blocks.

You’ll see that I put a wait block in my loop. It doesn’t make sense for the computer to update the time more often than is necessary (otherwise we’re just wasting computing resources doing nothing useful and potentially draining the battery on a mobile device).
A delay of half a second between updates seems to work well.
Test your code block. Does it continually update the value of digital time 24h when it runs?
Congratulations! Your project is now a working digital clock. Let’s now turn our attention to displaying today’s date as well.
Ideally we would like our calendar to show today’s date in an easy-to-read format such as Friday 13 July 2020. Let’s go through it step by step.
Convert the day of the week from a number to the name of the day.
First, create a variable named day of week and update the define get time block to set its value (use the current [day of week] block). That will give us the day of the week as a number.
So far, so good. But how do we convert that into the name of the day? Well, one way could be to use a long series of if... then... else blocks like this:

This would work for a set of 7 possible values but isn’t very elegant or readable. And if we had 100 possible values, it would get very unwieldy indeed.
A better solution is to make use of Scratch lists. We saw earlier that a value of 1 means Sunday, 2 means Monday and so on. If we create a list of days where item 1 is Sunday, item 2 is Monday and so on, all we have to do is pick the correct numbered item from the list.
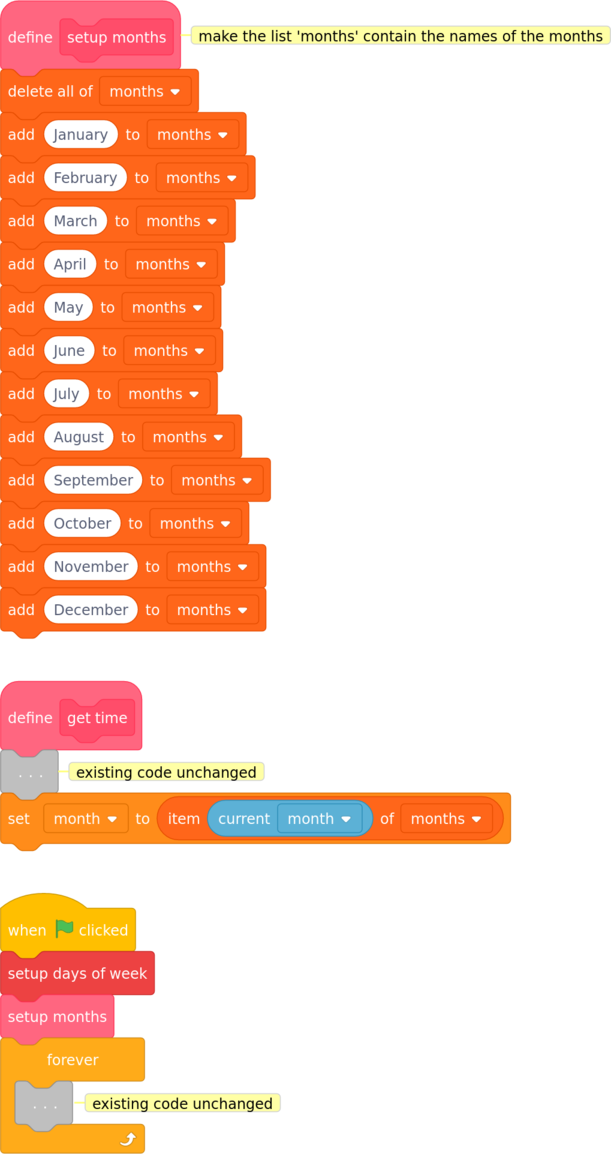
Let’s create the list (use the Make a List button in the  category) and call it
 days of week. Then make a block named setup days of week to set up our list (it is possible to put items in the list manually but it’s more reliable to use code). Finally, update the block in get time that sets the value of our day of week variable so that it gets set to the name of the day rather than the number.
Hint 1:
To add an item to a list, use the ![add [text] to [list]](img/add_item_to_list.png) block.
block.
Hint 2:
It’s a good idea to remove everything from your list before you start, otherwise every time your program runs it will add more and more items to your list and eventually it will become huge. To remove everything from a list, use the ![delete all of [list]](img/delete_all_of_list.png) block.
block.

When you create your list, Scratch shows it on the screen. Test your setup days of week block by clicking on it. Does the list contain the 7 days of the week starting with Sunday? Does the day of week variable contain the correct day name for today?
Once you’re happy with your code, you can untick your days of week list in the variables category to remove it from the screen.
Convert the month from a number to the name of the month.
We can use exactly the same principle as we used for the days of the week for the months of the year.
Create another list, this time called months, and a block setup months to set the list’s items. Then update get time to set month to the name of the current month.
Again, test your code. Does the months list contain the 12 months of the year? Does the month variable contain the correct month name for today?
Arrange the component parts of the date on the stage.
Drag your variables to where you want them displayed on the stage. You can change the style of display by either double-clicking or right-clicking on them. The large readout style is probably most suitable here.
My stage now looks like this:

As you can see I decided to place the digital time and the date inside the clock face, but you can place yours anywhere you like.
Well done. Your project is now a working calendar and digital clock. We can now start working on the analogue (moving hands) clock display.
Let’s give our program a working analogue clock display with an hour hand, a minute hand and a second hand.
Before we get started on the code, I first need to explain the direction property of a Scratch sprite.
In Scratch each sprite has a direction which tells the sprite which way it is facing and in which direction it will move. Scratch’s direction value is very like a compass bearing:
0 means pointing straight up (north on a compass)90 means pointing to the right (east)180 means pointing straight down (south)−90 or 270 means pointing to the left (west)Here is a diagram showing Scratch Cat facing north, east, south and west.

To get a better idea of how the direction value affects a sprite, try this:
Add the Arrow1 sprite from the Scratch library to an empty project and click on the Direction value.
Drag the direction arrow (the white arrow on a blue circle) around and watch how the direction value and the arrow changes.
Follow the steps below to get the second hand working.
Convert seconds to a direction
The second hand sprite is drawn so that one end is positioned at the centre of the clock face, and when its direction is 0 it points straight up. To make it move like the second hand of a clock, all we have to do is change its direction.
Can you work out how to calculate the correct direction for the second hand sprite? Remember that our second variable holds the seconds component of the current time.
As you know, there are 360° in a full circle and 60 seconds in a minute. That means if we divide 360 into 60 equal parts, each part will represent one second.
Simply multiply that value by the seconds component of the current time and that’s the direction we need the second hand to point.

Get the second hand working
Now we can point our second hand in the correct direction, let’s connect it up to our existing code. Our existing loop is in the stage, which means that it can’t change the direction of the second hand sprite (or any other sprite) directly.
In order to get the second hand sprite to change its direction, we are going to have to broadcast a message and get the second hand to listen out for the message.
Update the main loop in the stage to broadcast a message named update every time it updates the time (i.e. once per iteration of the loop). Then, tell the second hand sprite to listen for that message and when it receives it, set its direction.
In the second hand sprite:

In the stage:

Time to test our code. Click the green flag and watch the second hand: does it move correctly as the seconds tick past?
We now have a working second hand which rotates one sixtieth of a turn every second. If you think about how the minute hand of a clock behaves, you will probably realise that it is very similar indeed to the second hand: it also needs to move one sixtieth of a turn at a time, but once per minute instead of once per second. This means that the code for the minute hand sprite will be almost identical to the second hand sprite.
Add the code for the minute hand now.

Test your code: does the minute hand point in the right direction when you click the green flag? Does it move round the clock as the minutes tick past?
The hour hand moves in a similar way to the second and minute hands but with one added complication: the hour hand of a clock moves gradually between numbers during course of an hour. So when the time is half past four, the hour hand points mid-way between the 4 and 5 on the clock face. This makes calculating the right direction for the hour hand slightly more complicated.
Can you work out how to solve this problem? I can think of two slightly different ways.
Calculate a decimal hour value from the current hour and minute
e.g. if the time is half past four the value would be 4.5
for quarter to ten the value would be 9.75 (i.e. nine and three quarters)
To calculate this value we can use the expression hour12 + (minute / 60) (each minute is one sixtieth of an hour).
Then we divide the 360° in the full circle into 12 (because there are 12 hours on the clock face) and multiply by this value.
Calculate the number of minutes past 12 o’clock
e.g. if the time is half past one the value would be 90 (one hour plus half an hour)
for quarter past two the value would be 120 + 15 = 135 (two full hours plus a quarter of an hour)
To calculate this value we can use the expression (hour12 * 60) + minute
Then divide the full circle into the number of minutes in 12 hours (12 * 60) and multiply by this value
Add your code to make the hour hand turn.

Test your code: does the hour hand point in the right direction when you click the green flag? If you leave it running, does it move gradually round the clock as the minutes tick past?
If you don’t want to wait, there’s another way to test your code:
Click the red stop sign to stop the program running
Detach your point in direction block from the when I receive (update) block
Add some temporary blocks to set the hour12 and minute variables to the values you want to test
Place your point in direction... block below them:

Click on your blocks and check that the hour hand points in the right direction
Repeat the test several times using different test values for hour12 and minute. Remember to check some o’clock times such as midnight (set hour12 & minute to 0) and six o’clock as well as different numbers of minutes past the hour such as 1, 15, 45, 59 etc.
Congratulations: your program is now complete and working. Thank you for following this tutorial — I hope you enjoyed it and learned from it.
If you like you can improve your project further — read on for some ideas.
Here are a few ideas for improving the project, in no particular order.
Improve the visual design:
Use a sprite to display the individual digits of the digital clock display (see this LCD digit project for a suitable sprite)
Display the month as a costume of a Month sprite with a different background picture for each month
Make the clock chime on the hour and quarter hours like an old-fashioned grandfather clock.
(The famous Westminster Chimes sounds can be found online, for example here or here.)
Or see Lillycat44449’s version for an example of building chime tunes from the musical notes in the Scratch libary.
Here is a list of resources used in this tutorial. Many thanks to the authors for making their work freely available.
Scratch: the brilliant coding tool from the Lifelong Kindergarten Group at the MIT Media Lab
![]() Hint icon by Alexander Kahlkopf of iconmonstr
Hint icon by Alexander Kahlkopf of iconmonstr
![]() Note icon by Vectors Market from flaticon
Note icon by Vectors Market from flaticon
This document was produced using pandoc universal document converter.
The PDF version was produced with weasyprint HTML to PDF converter.
The Scratch code images were produced with ScratchBlocks.

This work is licensed under a Creative Commons Attribution-NonCommercial-ShareAlike 4.0 International License.